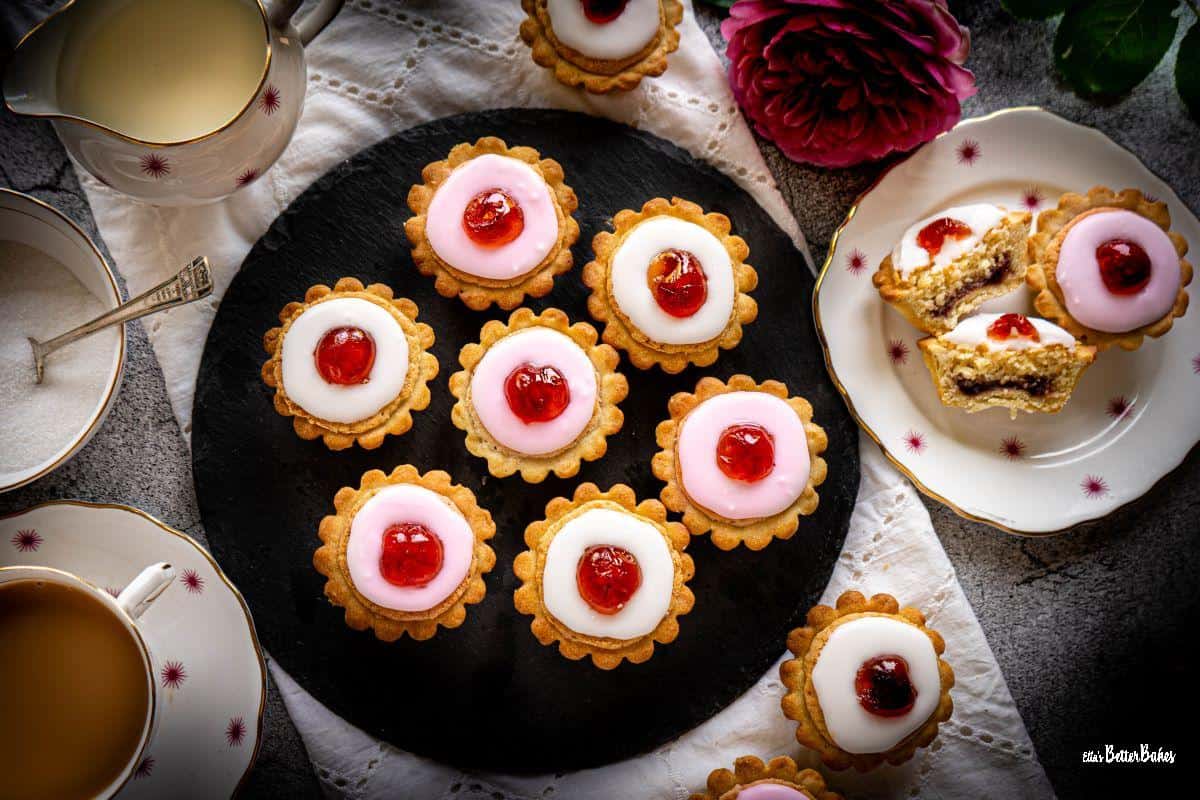
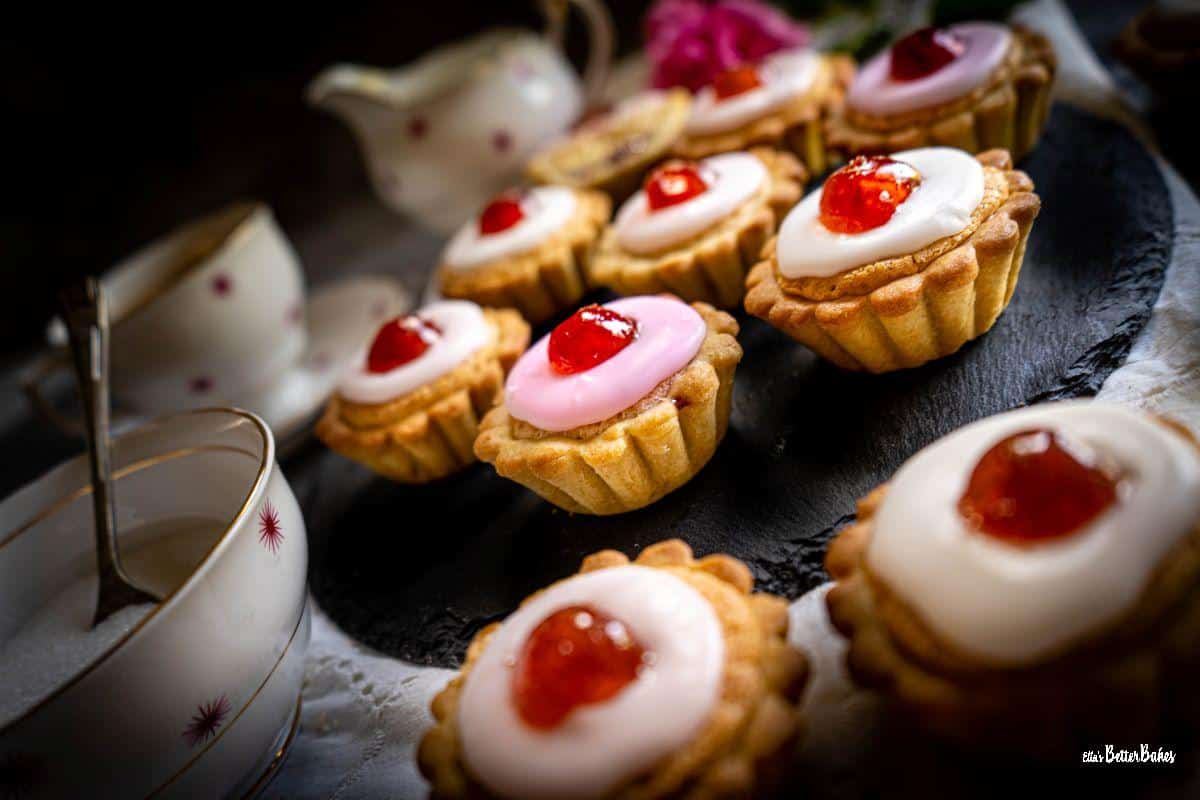
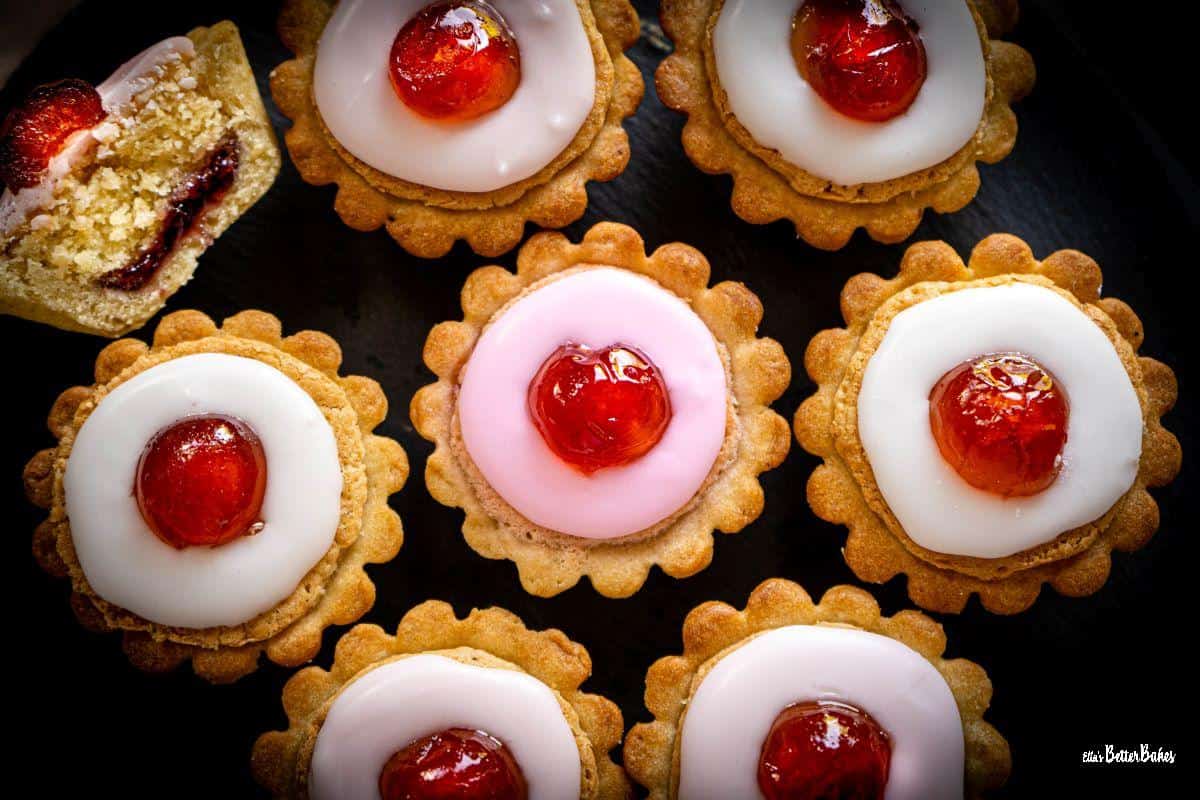
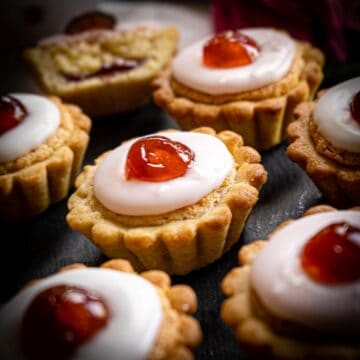
Cherry Bakewell Tarts
These are truly THE BEST Cherry Bakewell Tarts ever!
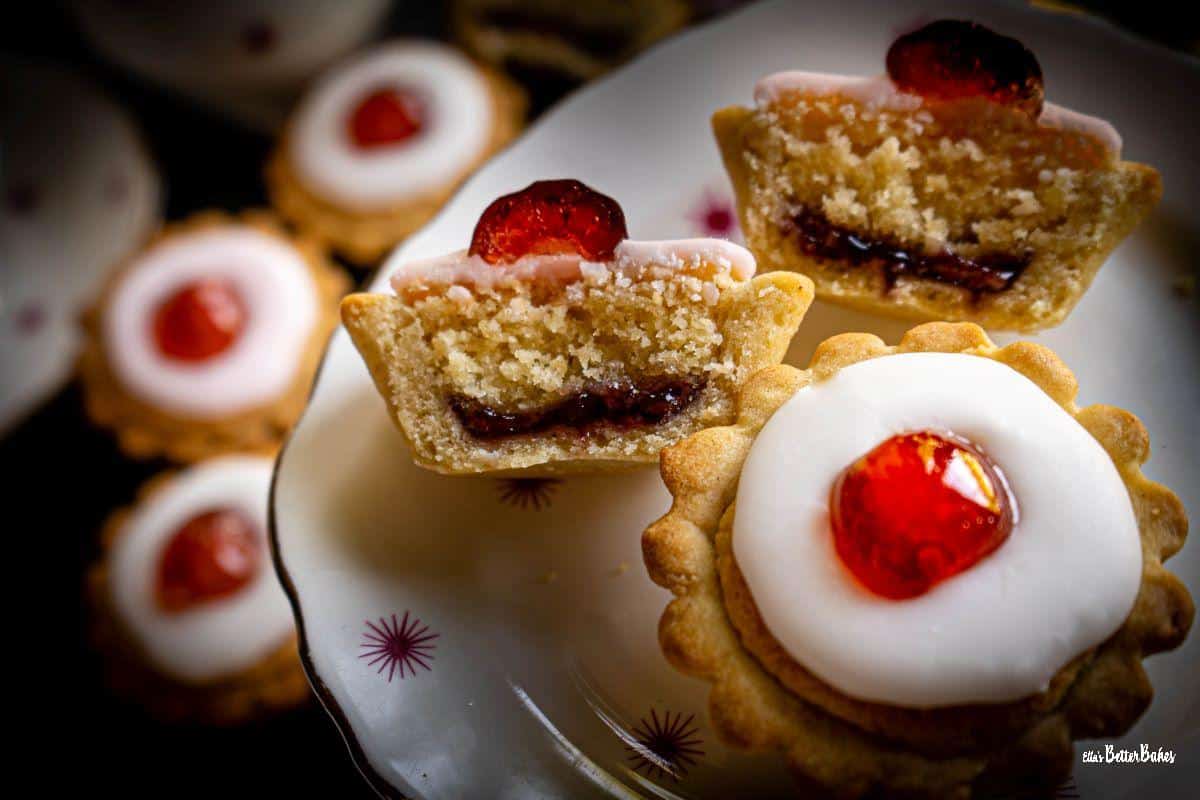
Each of these gorgeous little tarts contains a layer of cherry jam, a layer of light cakey almond frangipane and a topping of soft icing all encased in a sweet, soft pastry shell. Oh and not to forget the obligatory cherry on top!
Homemade Cherry Bakewells are truly next level.
Pair them with a nice cup of tea and, oh boy, life doesn't get much better!
These delicious Cherry Bakewell Tarts are also surprisingly easy to make. Fortunately, there is absolutely no need to blind bake the almond pastry cases first too.
I hope you enjoy them, please click on the stars or leave a comment to let me know how you got on 🍒
Jump to:
Why make these cherry Bakewell tarts?
Cherry jam filling✔️
Light, cakey, richly almond frangipane filling✔️
Soft, sweet pastry case with NO blind baking required✔️
Soft, deep simple icing✔️
Ingredients
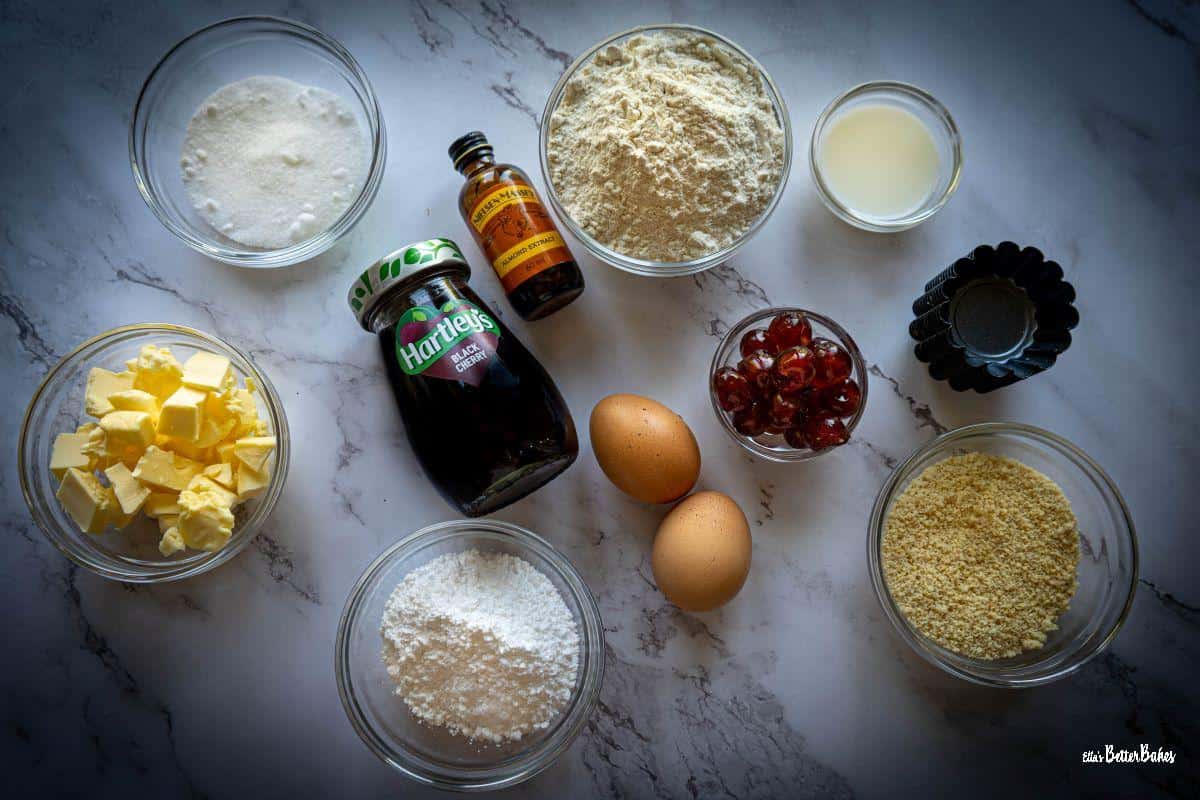
See Recipe Card for quantities.
- Plain (all-purpose) flour
- Eggs
- Icing (confectioner's) sugar
- Milk
- Salt
- Ground almonds
- Unsalted butter
- Caster (superfine) sugar
- Almond extract
- Glace cherries
- Cherry jam
- Red food colouring
Instructions
Hint: I highly recommend reading the TOP TIPS below for some helpful advice as to how to ensure your Cherry Bakewell Tarts turn out perfectly.
See end of post RECIPE CARD for precise quantities and instructions.
Sweet pastry
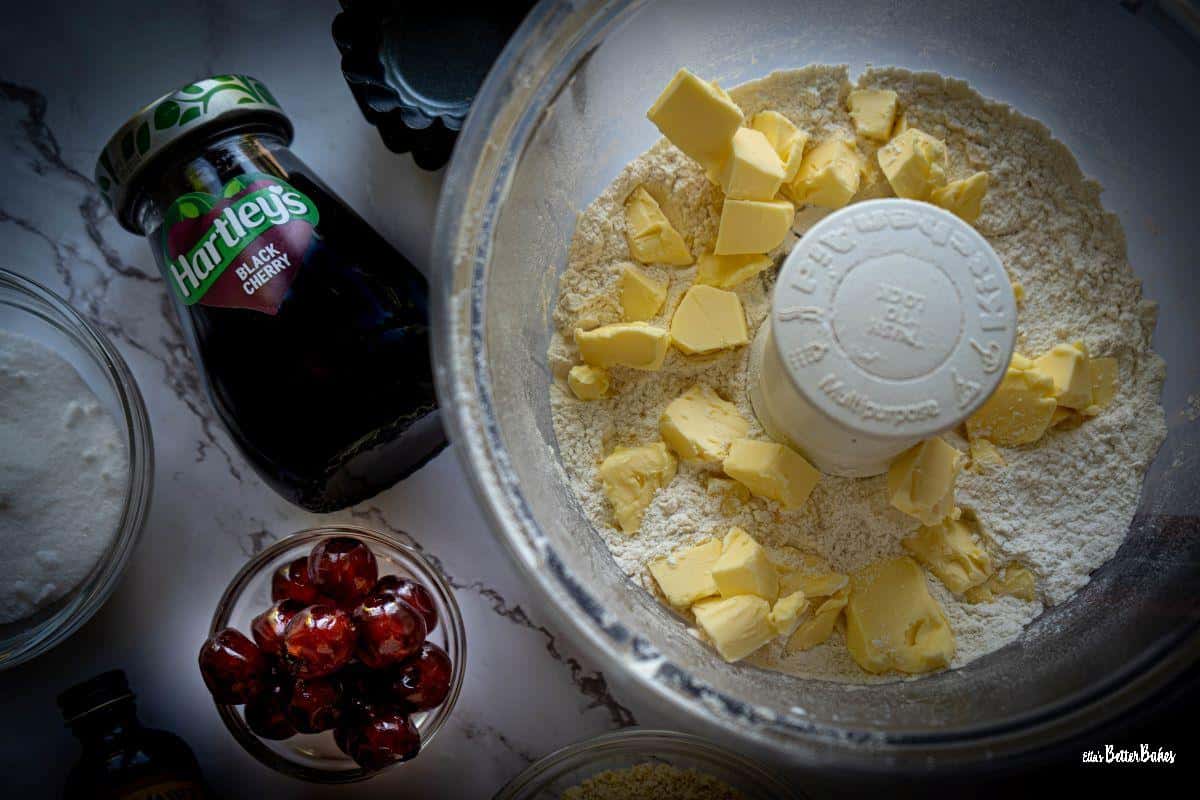
Mix together flour, salt and sifted icing (confectioner's) sugar and then dot over cold cubed butter.
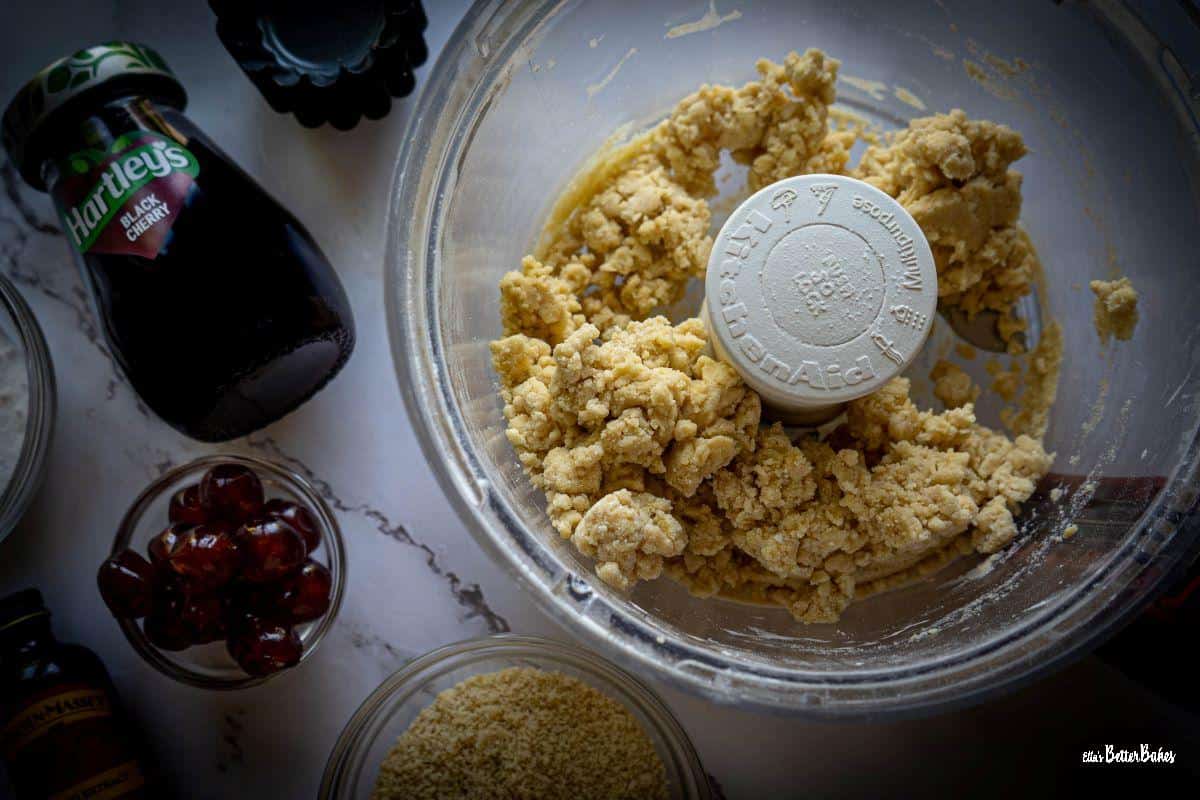
Pulse until sandlike, then mix in egg yolk and milk and continue to pulse until the mixture starts to clump.
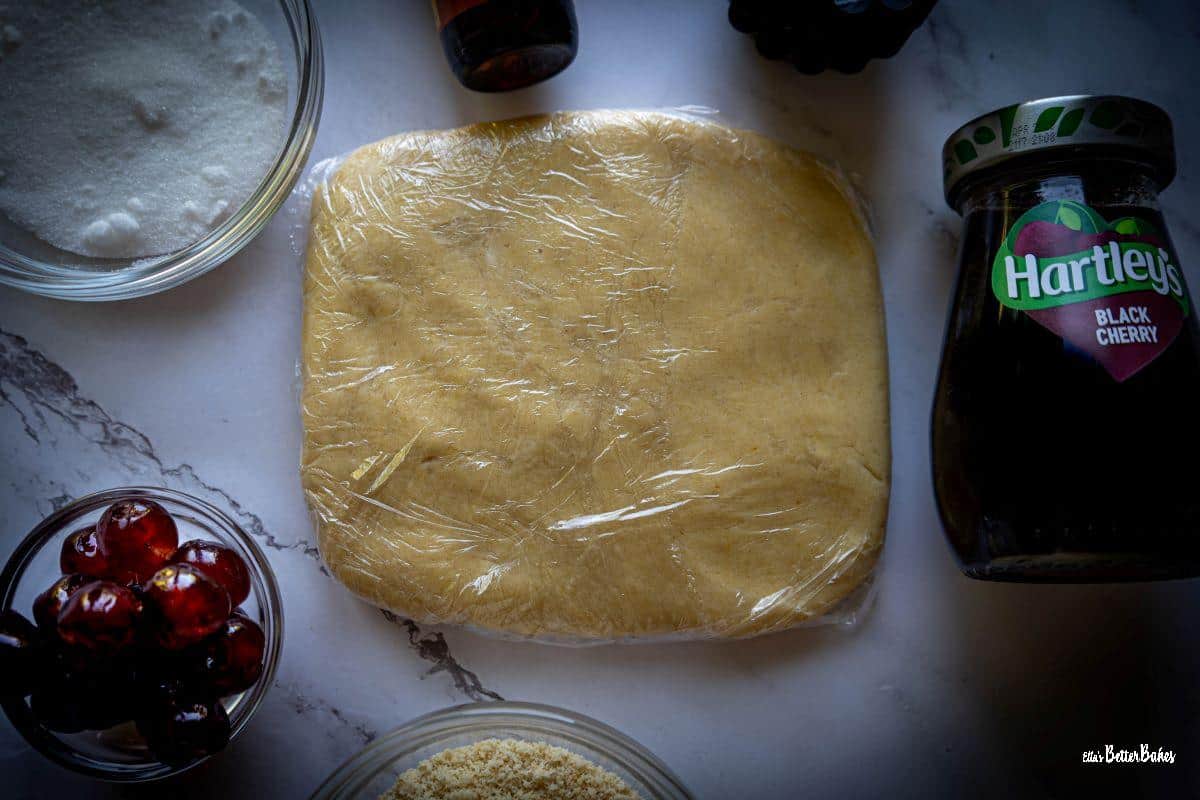
Tip out onto a lightly floured surface, then bring together into a ball. Flatten into a square shape, cover in cling film (plastic wrap) and refrigerate for 30 minutes to set.
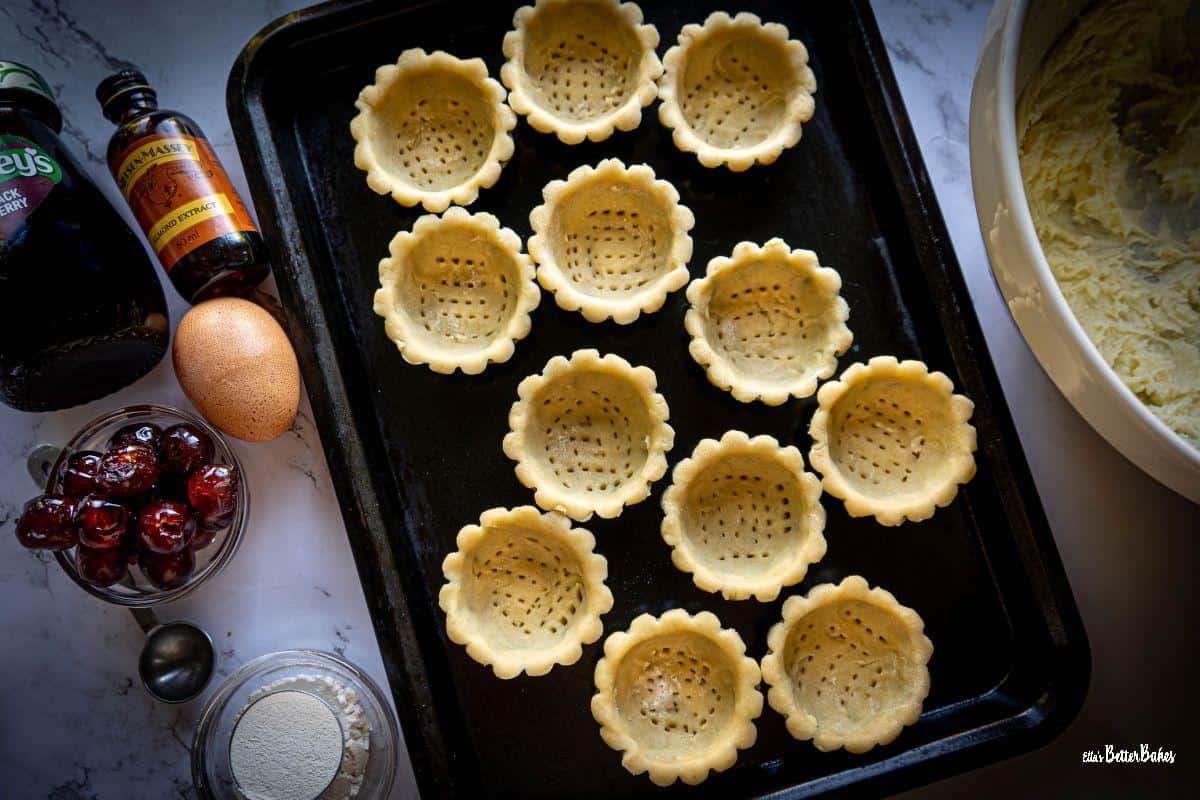
Cut the dough into 16 equal amounts and press into greased fluted tartlet tins, pushing into the base first and then up into the sides, ensuring the pastry rises just above the edge of the tin.
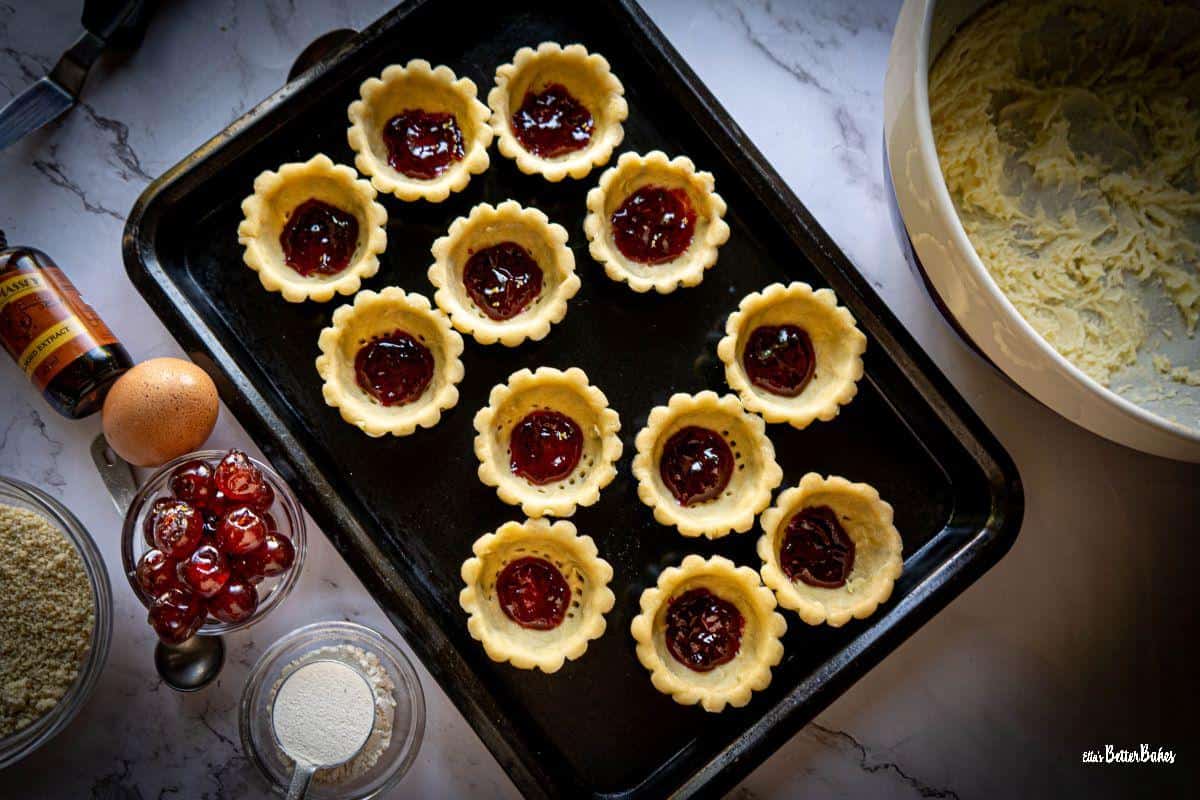
Prick the base of each tartlet and then refrigerate again to set the pastry. Remove and add three-quarters of a teaspoon of cherry jam to each tartlet.
Almond frangipane filling
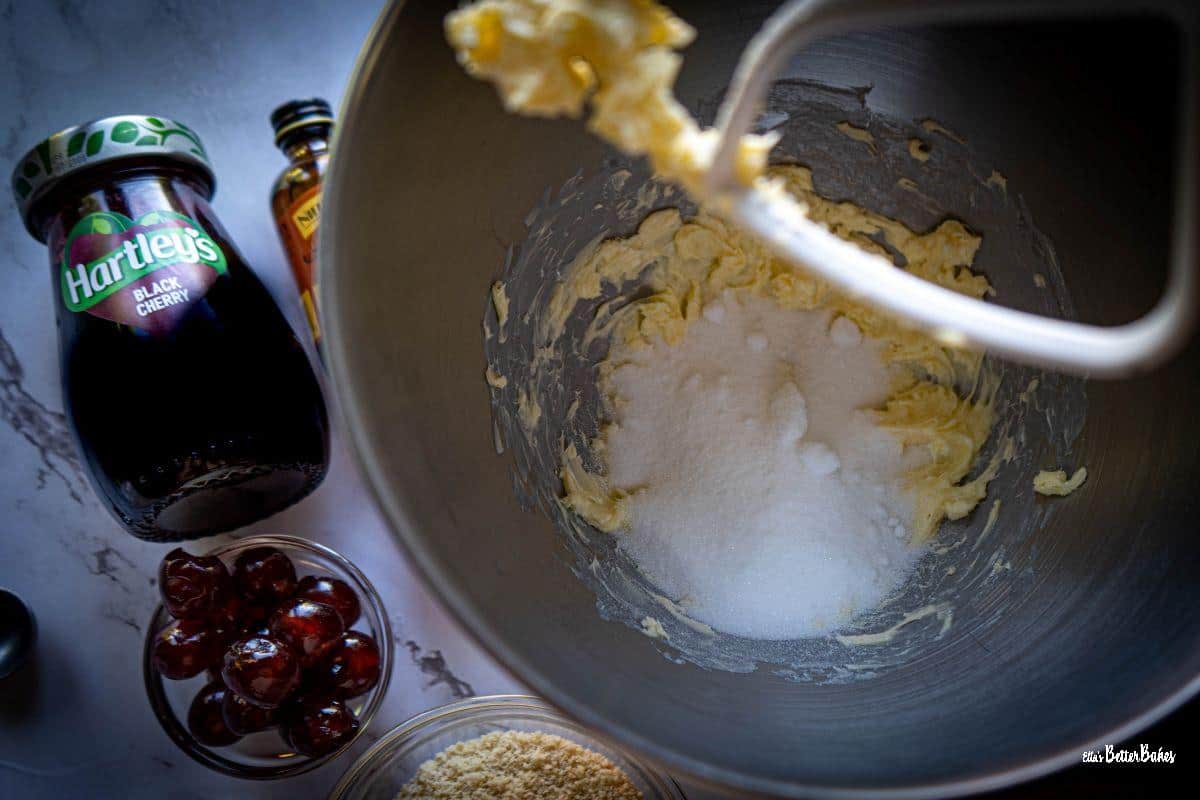
Beat butter briefly to ensure a spreadable consistency, add sugar and beat until pale yellow, light, fluffy and airy.
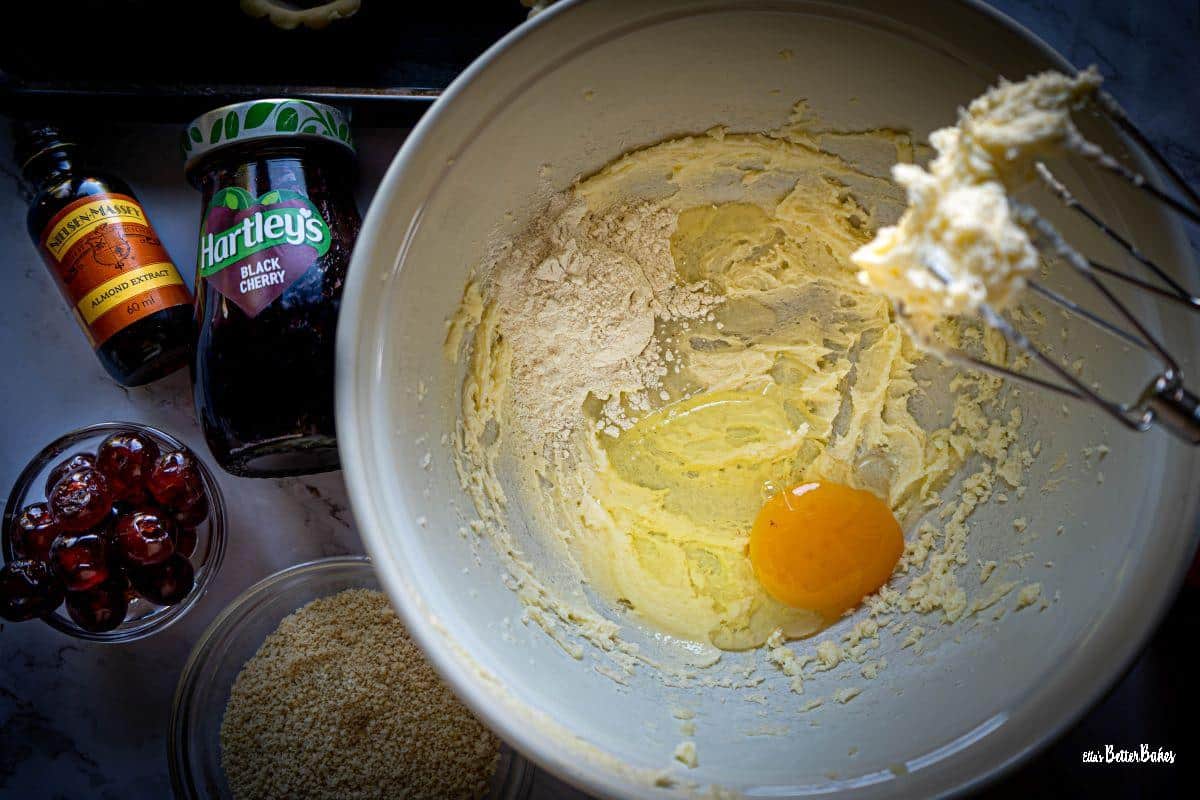
Add egg and flour and beat on low until incorporated. Add almond extract and then beat on a fast speed for about 10 seconds until airy.
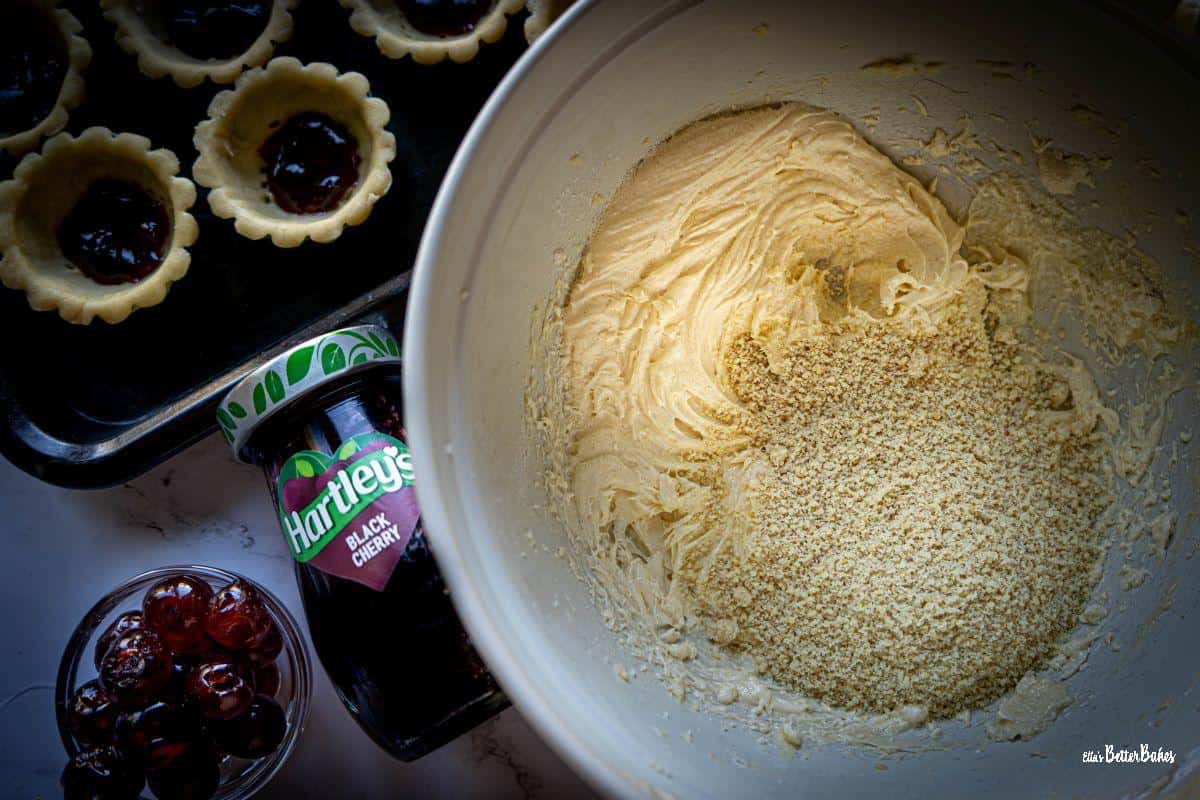
Carefully fold in ground almonds to retain air in the mixture.
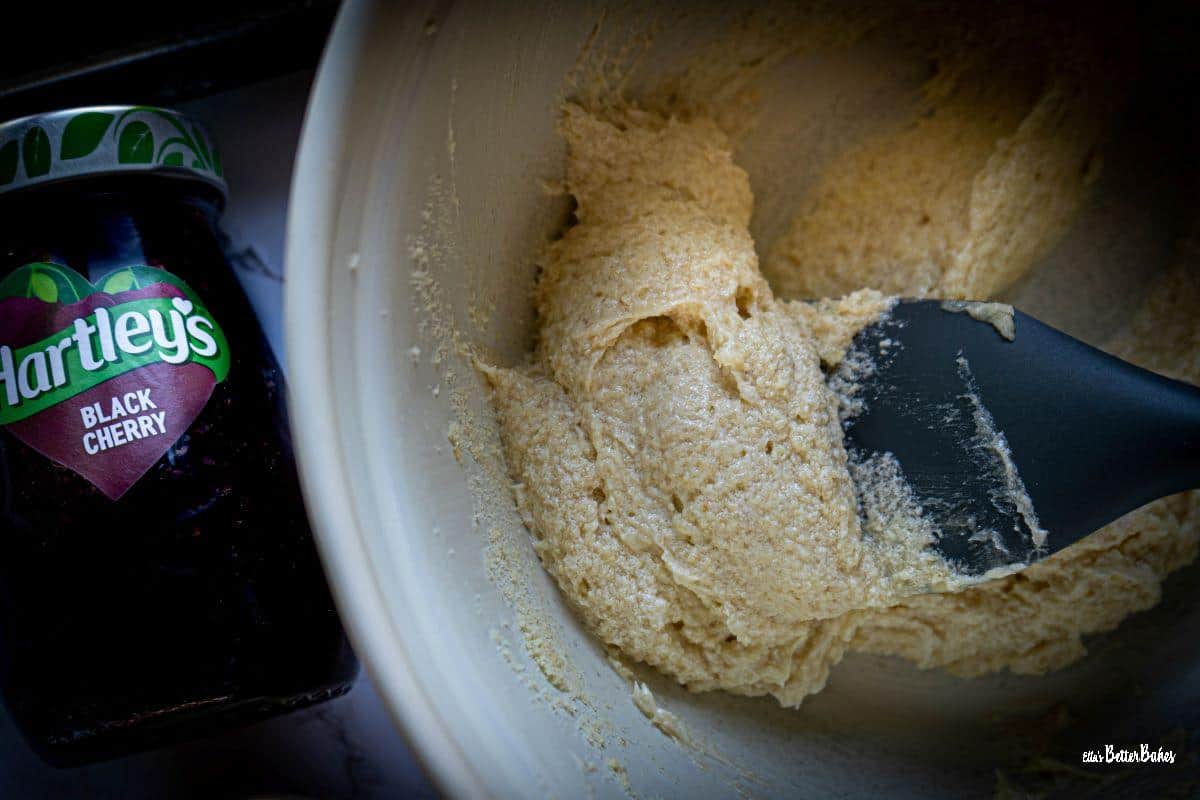
Your frangipane batter should be quite wet and look a little curdled in appearance.
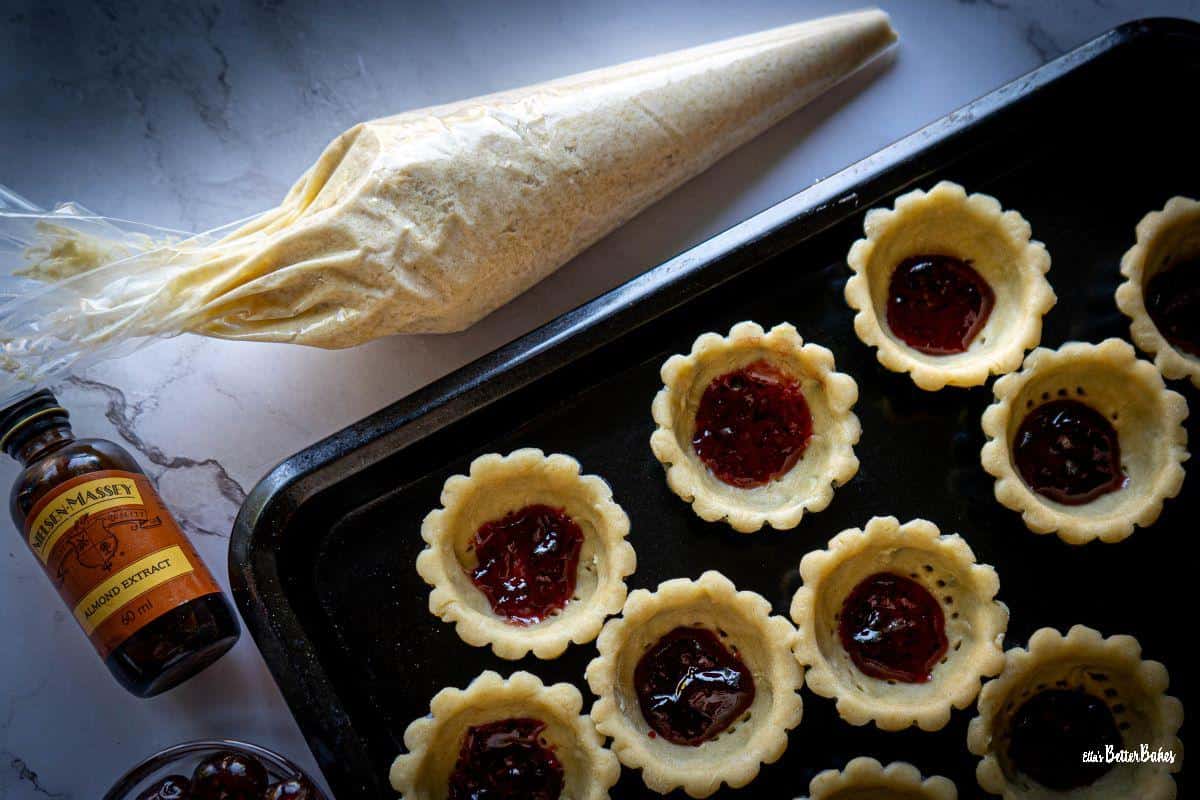
Add the frangipane batter to a piping bag and cut off the piping bag tip.

Pipe equal amounts into each pastry case, leaving a gap of about half a centimetre below the rim of the pastry case.
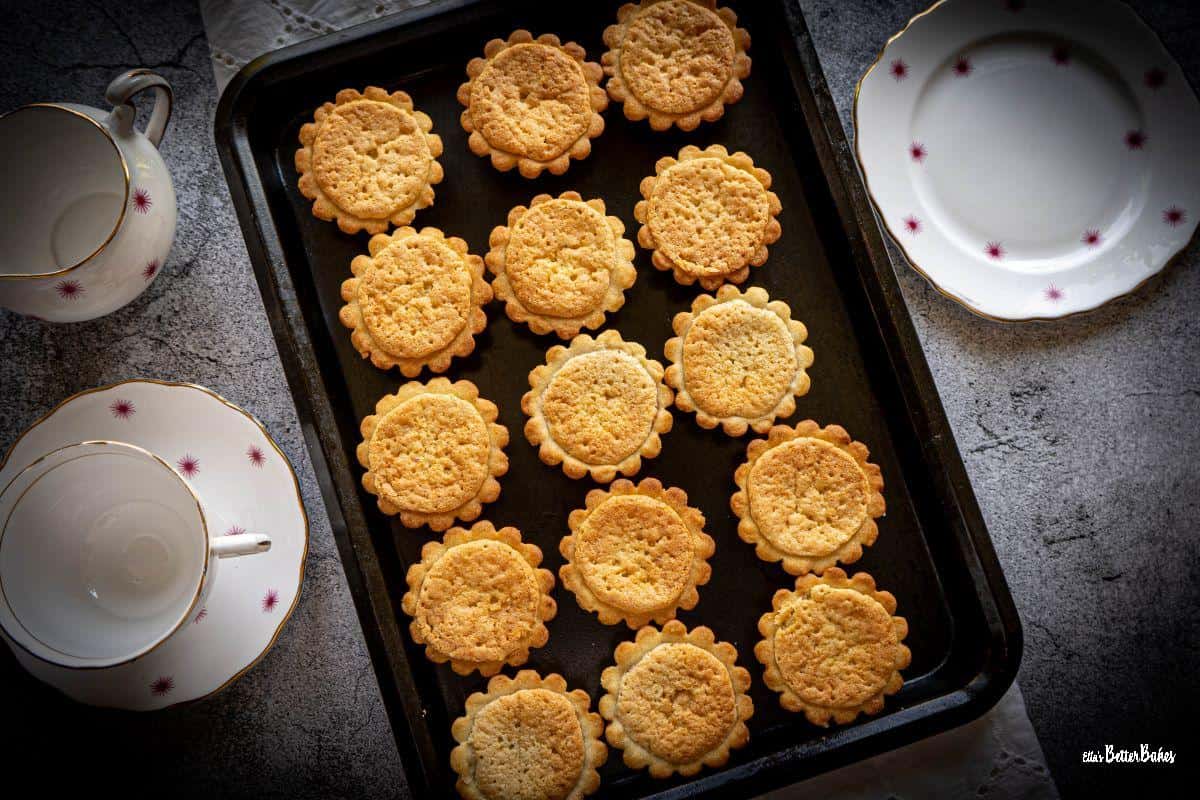
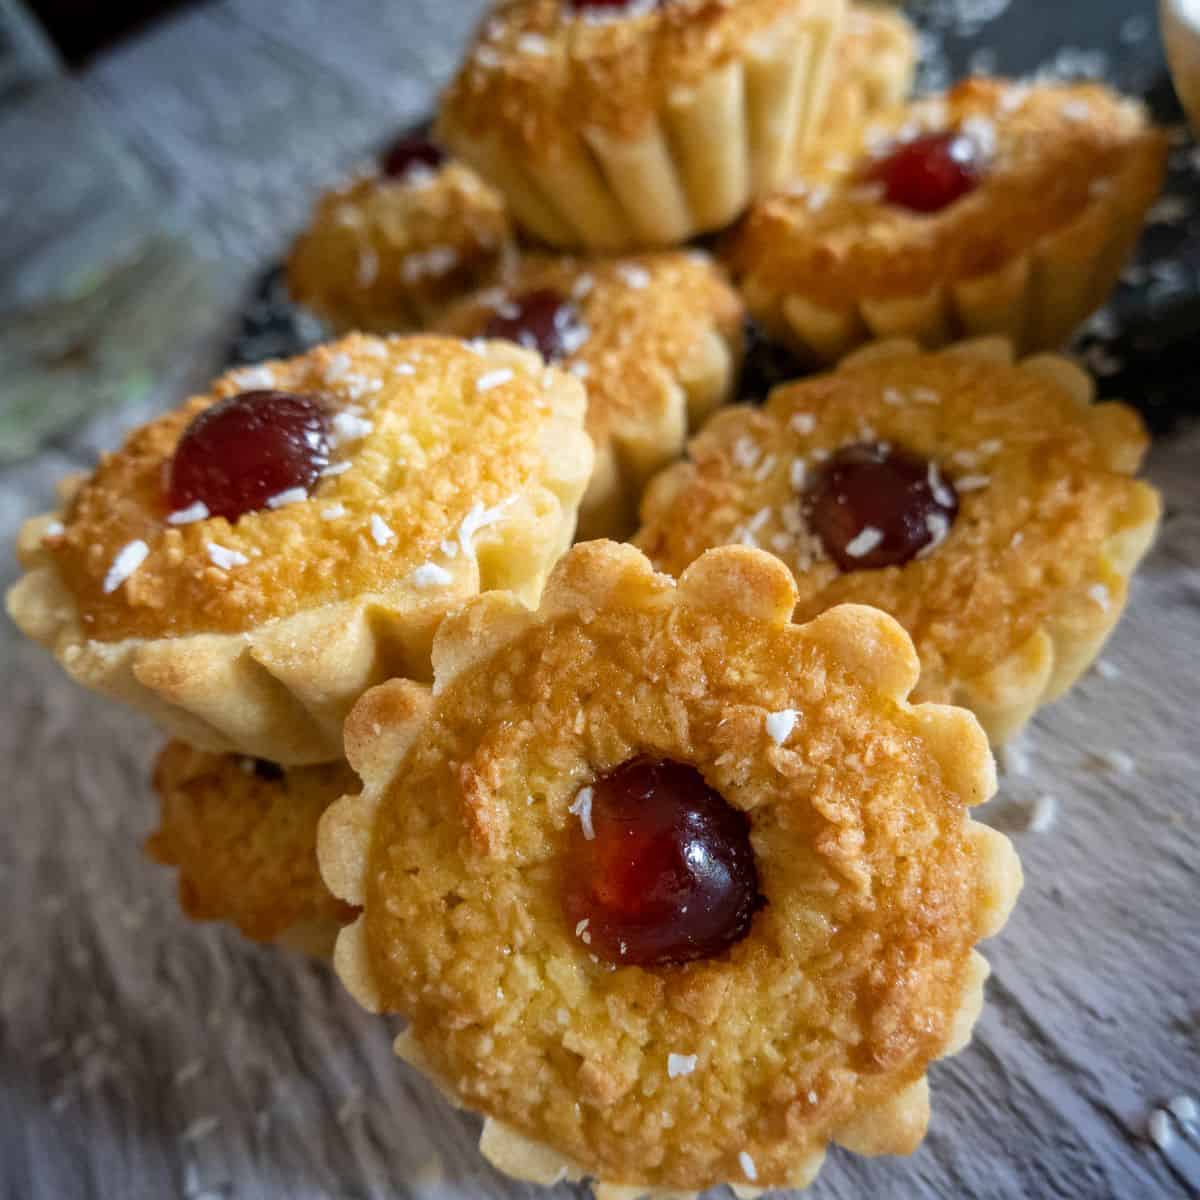
Bake on a heated baking tray until risen, golden and slightly domed. Leave to cool in the tartlet tins on the tray. After five minutes, gently depress the frangipane to flatten the tops.
Soft, smooth icing

Split your icing sugar into 2 equal amounts and add 2 teaspoons of cold water to each. Mix to produce a thick and gloopy icing. Mix in a tiny bit of red paste food colour to one lot of icing.
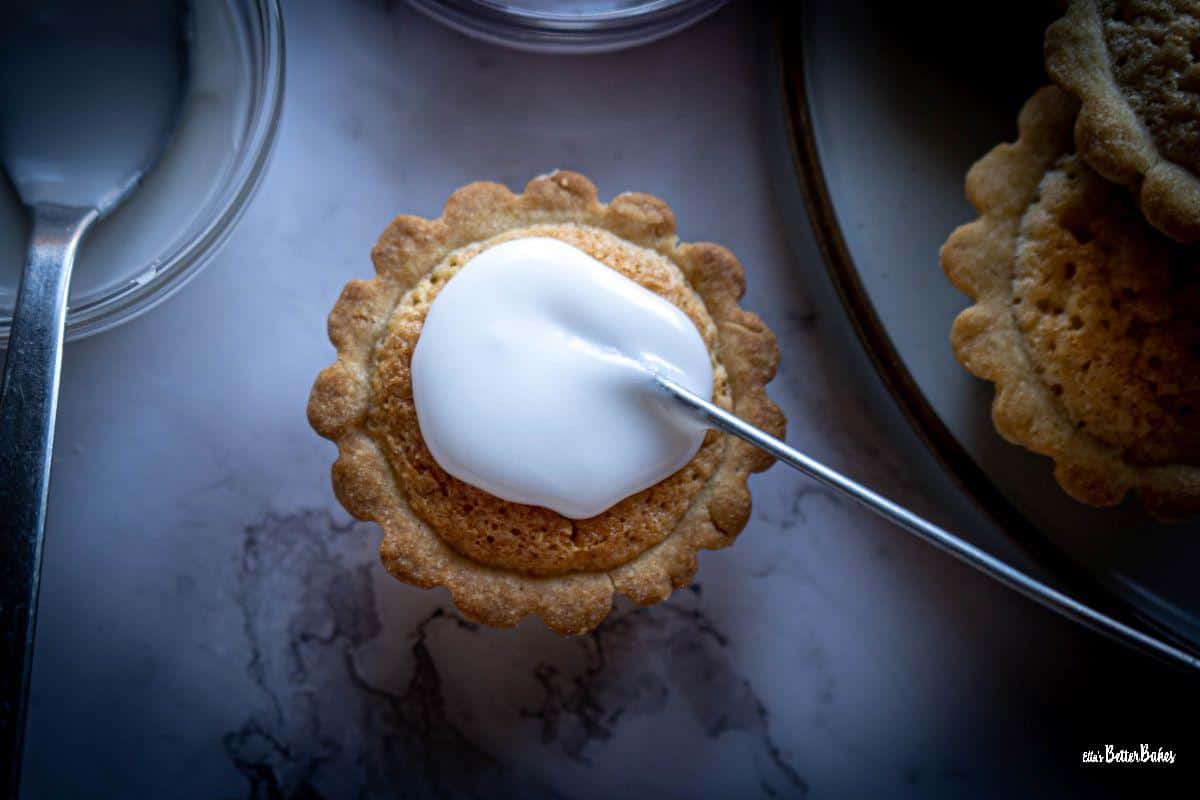
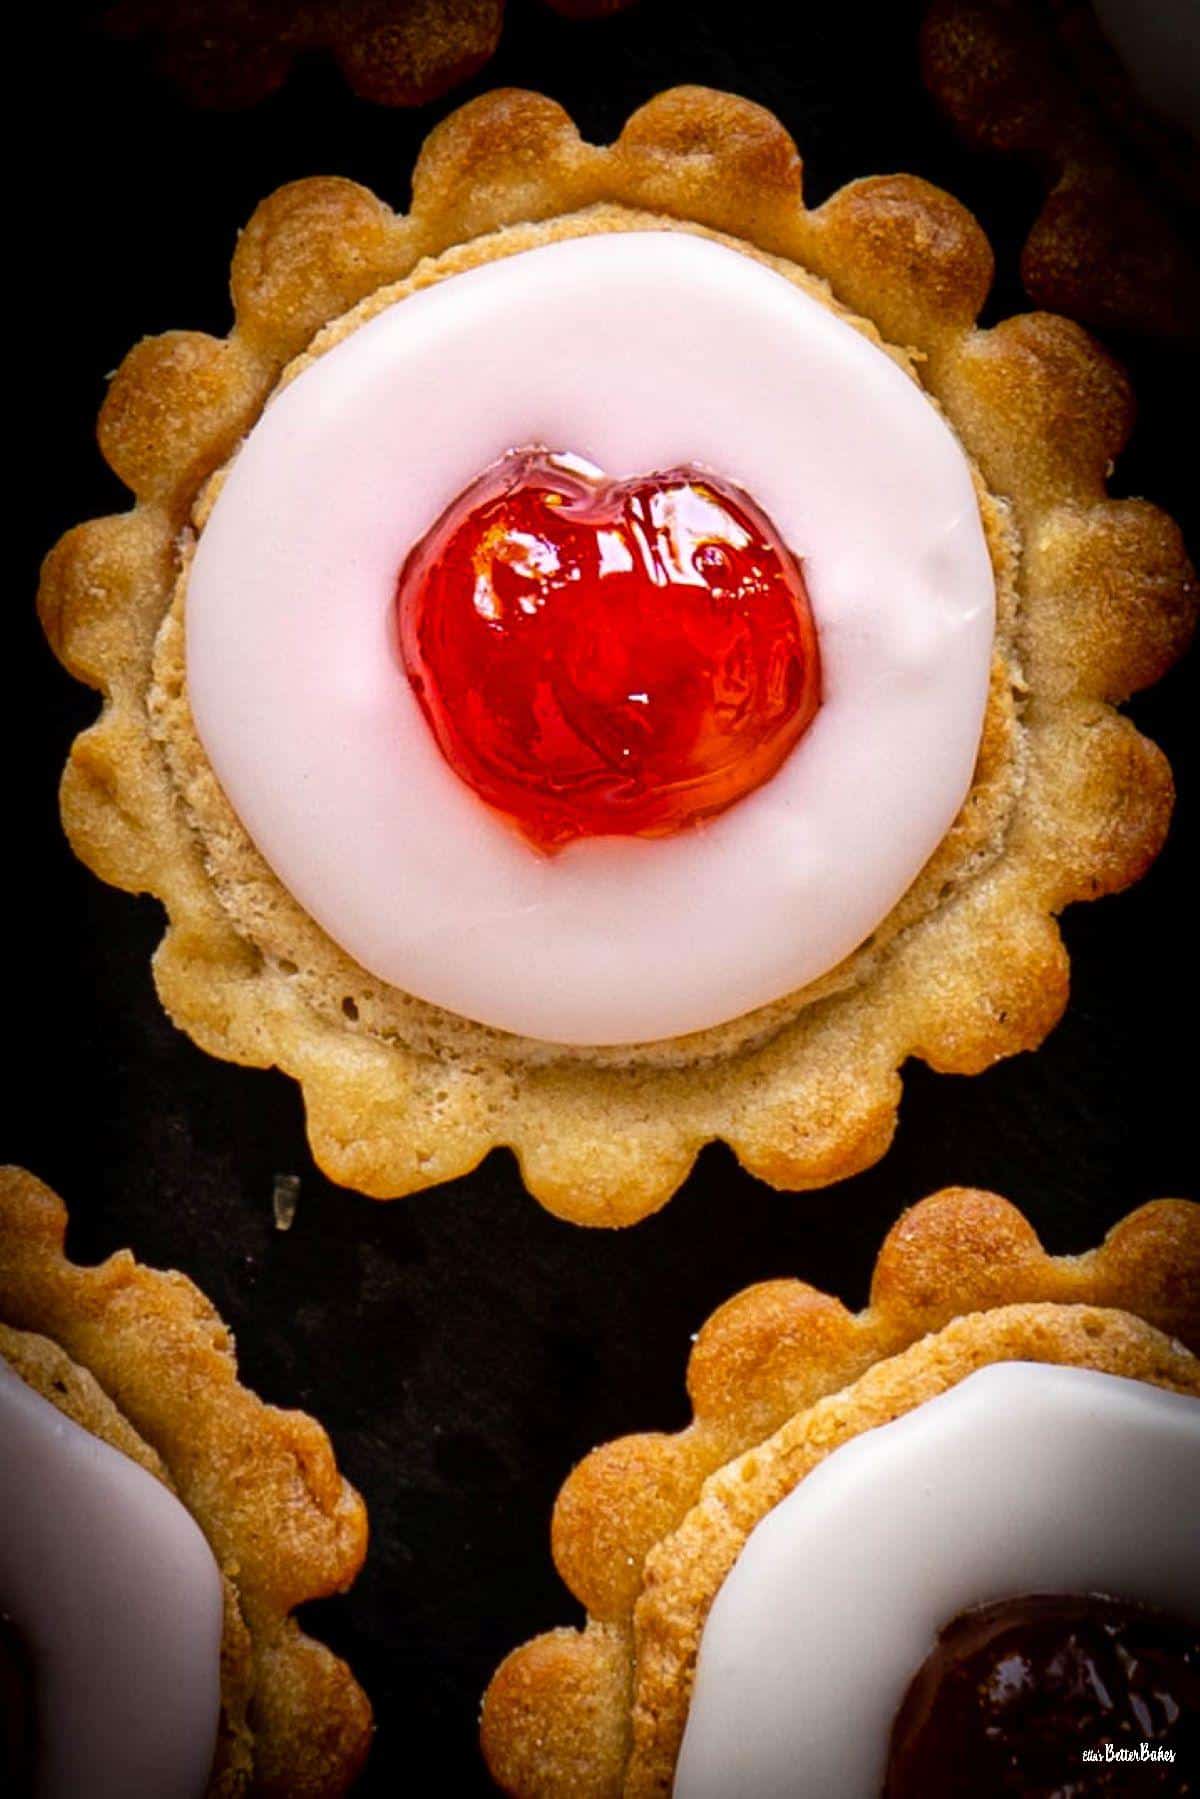
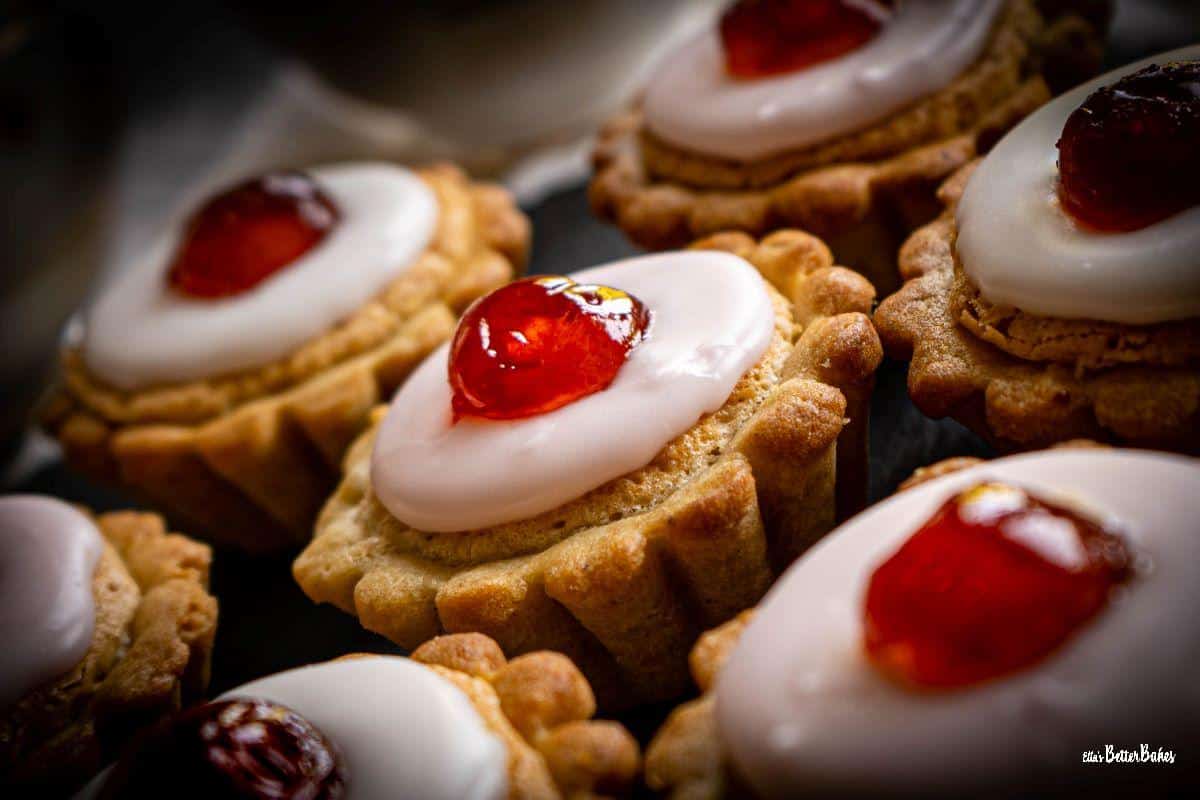
Blob the icing onto the centre of the tart and gently spread out using a skewer or the handle of a teaspoon. Place half a glace cherry into the middle.
Substitutions
Don't have all of the ingredients for these Cherry Bakewell Tarts? The substitutions below will work just as well:
- Ground almonds:-you can grind whole, skinned almonds down by using a coffee bean grinder or a food processor.
- Caster (superfine) sugar can be replaced with golden caster (superfine) sugar.
- Almond extract: you can use almond essence instead, it is made from artificial flavourings, so not quite as good, but it is a bit cheaper OR replace it with vanilla extract, as vanilla flavours also work really well in Cherry Bakewells.
- Unsalted butter: can be replaced with salted butter. I try to use unsalted butter to limit the salt content in my baking, but salted butter will work just as well. Spreadable butter should not be used because the added oil will affect the fat ratios in the recipe.
Equipment
See the Recipe Card below for the full list of equipment.
Key notes regarding the equipment needed to make Cherry Bakewell Tarts:
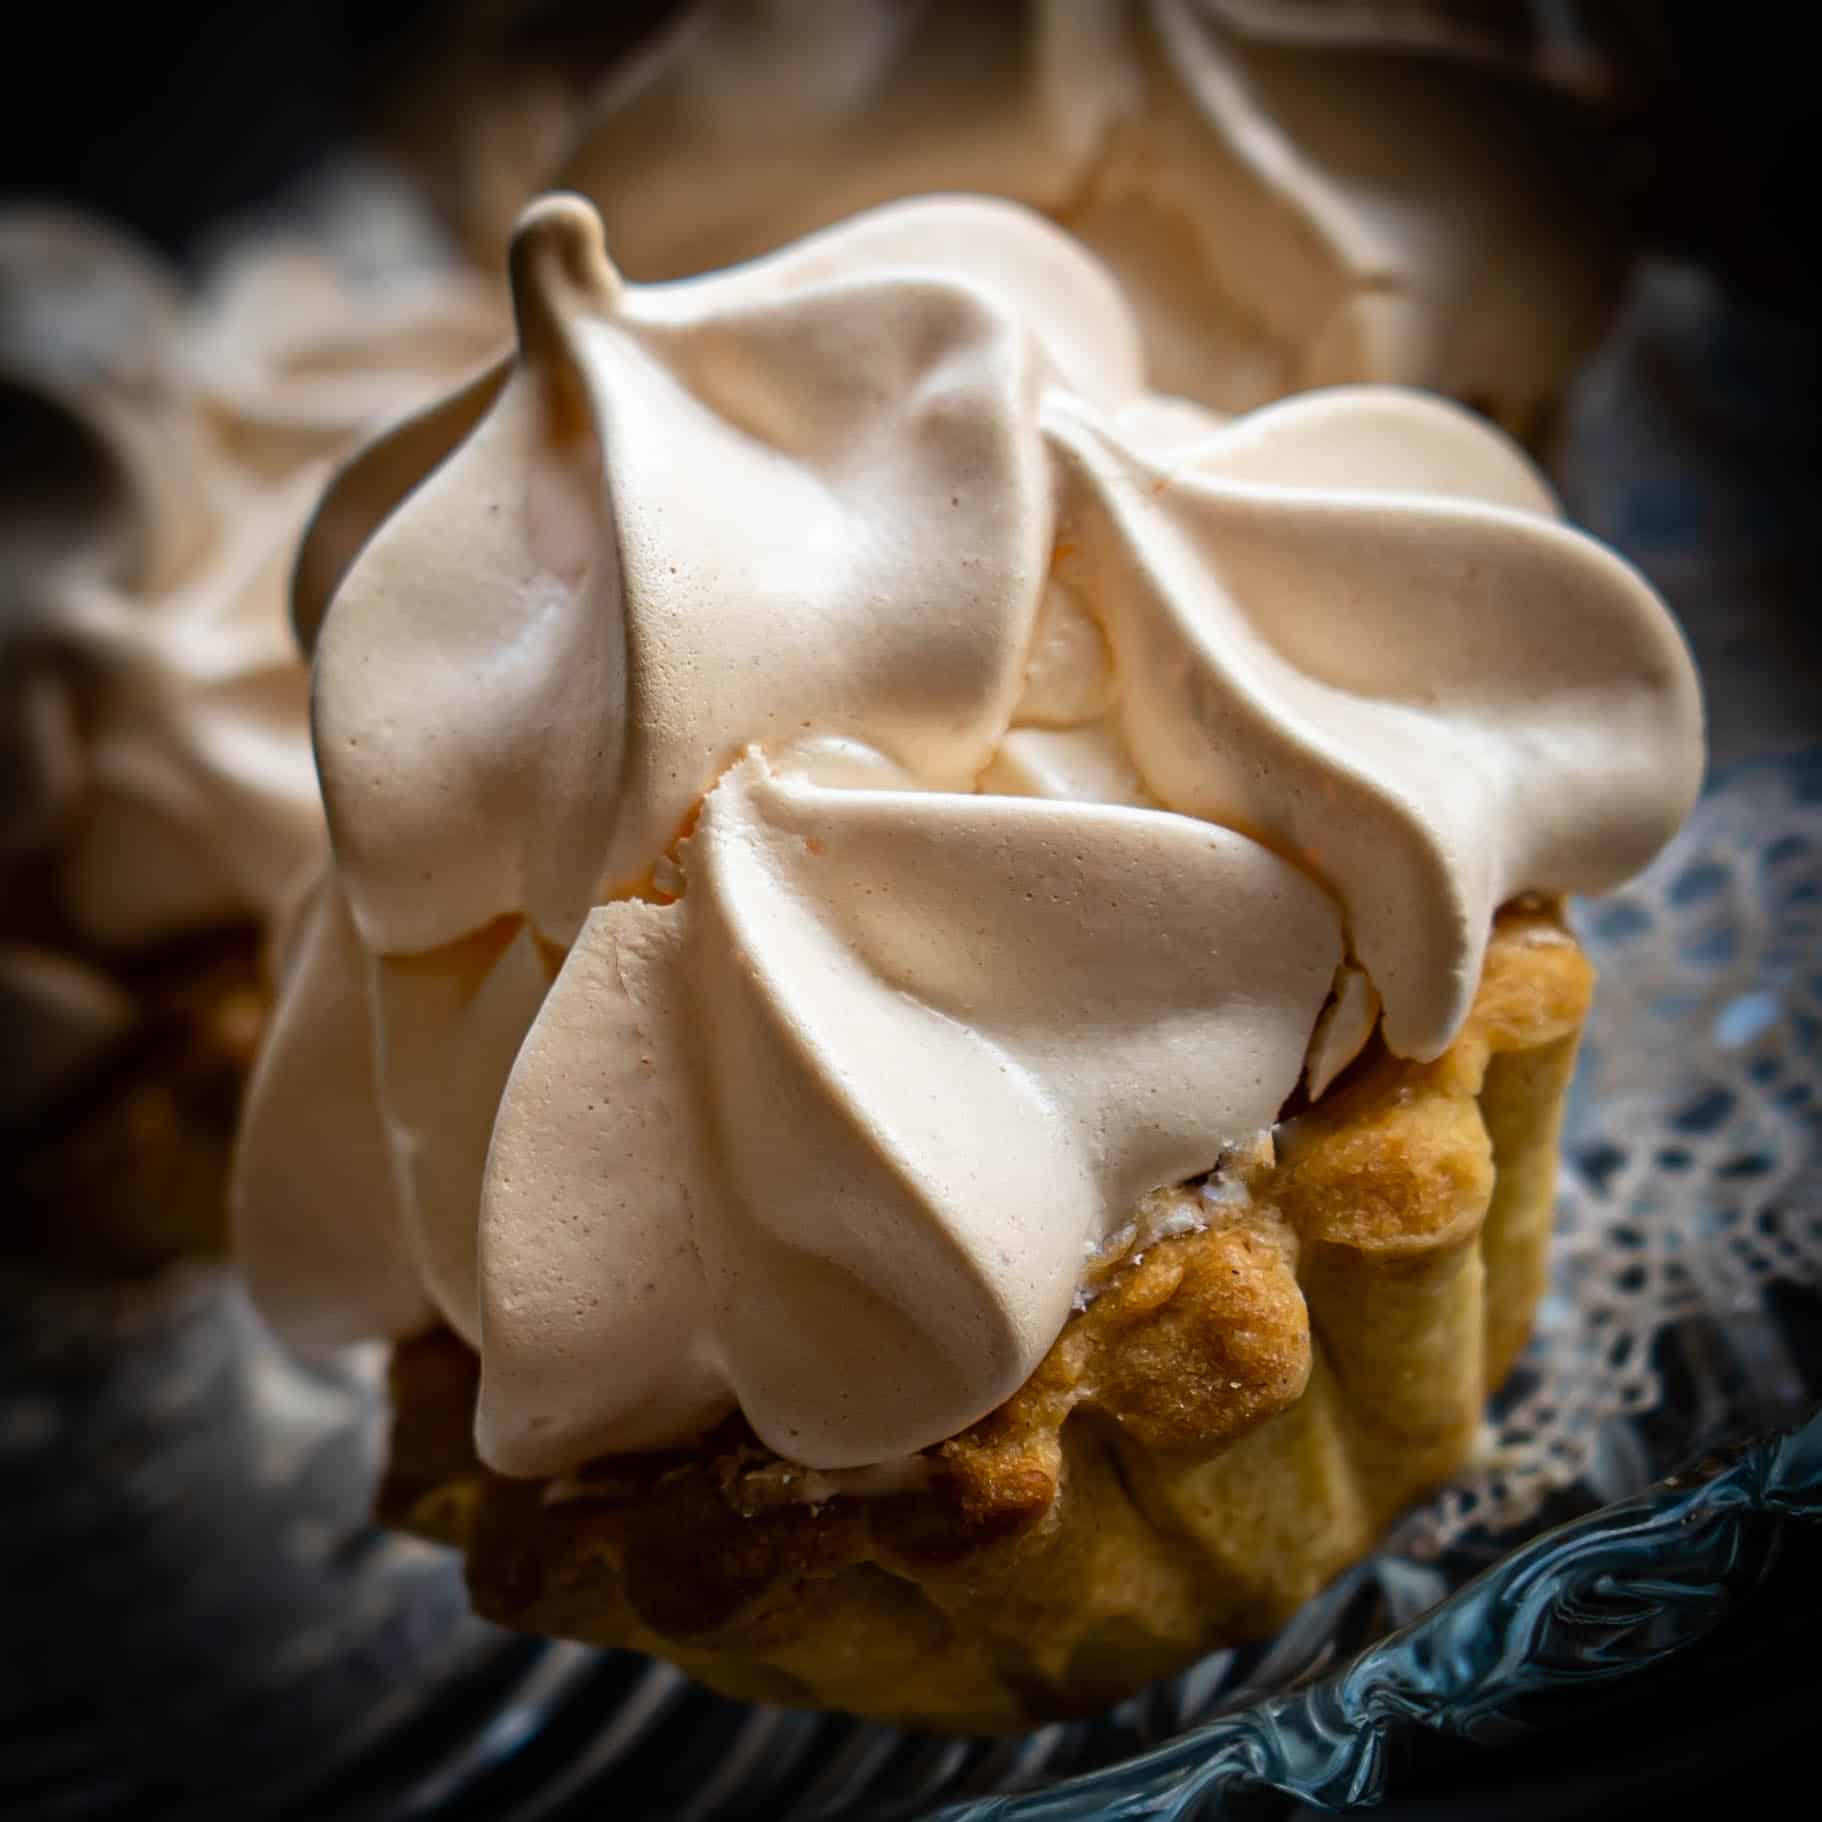
Tartlet cases are one of my baking must-haves. They give the pies a pretty flower-like appearance, and I use them in several recipes, including my Lemon Meringue Mini Tarts. You can use a muffin tin instead for these Cherry Bakewell Tarts. Use the same amount of pastry,y but only push the pastry up the sides about ¾ of the way.
Bristle pastry brush - I find using a pastry brush to grease the tartlet tins very useful, as it helps to get into the crevices of the fluted sides.
Hand mixer: is a better option than a stand mixer when making quite a small amount of frangipane, as per this recipe.
Professional large piping bags are required to get all of the frangipane in one bag.
Storage
Stored in an airtight container, these Cherry Bakewell Tarts will keep for up to a week.
You can save yourself some time and make the pastry cases in advance, freeze them and then fill them with jam and frangipane and bake from frozen.
Top tips
Sweet pastry top tips
- For the perfect pastry, it is vital that your butter, egg yolk and milk are all very cold.
- If your butter warms up after you've chopped it up, either return it to the fridge or pop it in your freezer for five minutes.
- Add your milk gradually; the pastry is only ready once it starts to stick together in large clumps, but you don't want it to be too wet.
- Use something flat and round to push the pastry into the tartlet tin base to ensure that the pastry is even. I use the end of my rolling pin, which is flat.
- The pastry must be refrigerated and be very cold before being baked; if warm, it will shrink in the tartlet case.
- Prick the pastry case with a fork, pressing right through to the base. This prevents the pastry from forming air bubbles when baking. The jam will not seep through because the pastry will expand to fill the holes whilst baking.
Cherry Bakewell tart filling top tips
- Warm your jam because it will then spread more easily on the base of each tartlet.
- Sieve your jam to get rid of any lumps.
- Your butter should not be overly soft; it should require a little pressure to squidge it together. If it is too soft, you will have a heavy, deflated frangipane.
- Beat your butter and sugar until it is light and airy; this can take a couple of minutes on a medium-high setting. This really makes a difference to your final frangipane, because it introduces the air it needs to rise.
- A good beat on a high setting, after adding your egg, flour and almond essence, introduces lots more air for a light frangipane. 10-15 seconds until the mixture is light and creamy should be enough.
- Scraping your bowl down at regular intervals is essential to ensure the frangipane batter is all equally mixed in.
- Press the frangipane down a little after it has been baked in order to flatten the top ready for icing.
Soft icing top tips
- Sift your icing (confectioner's) sugar because this produces a smooth icing.
- Your icing needs to be quite thick and gloopy so that it takes a few seconds to drop from the spoon onto the tart; otherwise, it will spread out too quickly.
- Add your cherry as soon as you've iced your tart, before the icing starts to set, otherwise the smooth iced surface will crack.
Linked Recipes
FAQ
Overworking pastry results in a tough pastry because the kneading process develops gluten. Sweet pastry should be soft and crumbly, and therefore, the dough should be brought together and chilled only.
📖 Recipe
Cherry Bakewell Tarts
Here's what you'll need...
- Food processor optional - you can make the pastry by hand
- Teaspoons
- Skewer or butter knife
Ingredients you'll need...
Sweet Pastry
- 225 g Plain (all-purpose) flour (1 Cup and 10 level tablespoons)
- 80 g Icing (confectioner's) sugar sifted (10 level tablespoons)
- ¼ teaspoon Fine salt
- 115 g Unsalted butter cold and cut into small chunks plus extra for greasing tins (1 stick or ½ Cup)
- 1 Large egg yolk cold (US = extra large)
- 3-4 tablespoon Milk cold
Almond Frangipane Filling
- 65 g Unsalted butter (plus a little extra for greasing) at room temperature (⅓ Cup)
- 65 g Caster (super fine) sugar (⅓ cup)
- 1 Large egg at room temperature (US = extra large)
- 2 tablespoon Plain (all-purpose) flour must be level
- 65 g Ground almonds (⅔ Cup)
- 1 teaspoon Almond extract
- 65 g Cherry jam (12 teaspoons)
Icing
- 150 g Icing (confectioner's) sugar sifted (1¼ Cup)
- 4 teaspoon Cold water
- 8 Glace cherries halved
- Red paste food colouring
Here's what we do...
Sweet Pastry
- Using your pastry brush, so that you can get into all of the crevices, grease each of your tartlet tins.
- Add your flour, salt and icing (confectioner's) sugar to your food processor with the blade attachment fitted and give it a whizz to combine evenly. Or you can mix it together in a large bowl.
- Dot over your cold grated/cubed butter and pulse about 15-20 times until the mixture becomes sand-like. Or rub in by hand by rubbing the butter into the flour between your fingers.
- Add your cold egg yolk and 3 level tablespoons of milk and pulse for about 10-15 pulses by which time the mixture should be starting to form clumps of various sizes. If this is not happening add another tablespoon of milk. I find I usually need 4 tablespoons.
- Lightly flour your work surface and tip your pastry mixture out. Bring the pastry gently together into a ball (it will be quite soft) but do not knead it. Then flatten out into a square shape with a depth of about an inch, wrap in cling film (plastic wrap) and refrigerate for 30 minutes.
- Cut your chilled dough in half and then half again and then do the same in the opposite direction, so that you have 16 squares of dough. They should all be the same size and weigh around 28 grams each.
- Roll a square of dough in your palm into a ball and then flatten it out to a circle of roughly 6 centimetres in diameter and pop it into a tartlet tin. Using your thumb flatten the pastry out so that it fills the base, then push it up the sides to fill the groves. Push the pastry just above the edge of the case, it will then have space to shrink a little when baked but will still retain its flower-like shape.
- Prick the base with a fork, pushing right through to the tin, then refrigerate again for about 15 minutes, so that the pastry sets and hardens a little.
- Place about ¾ of a teaspoon of cherry jam into each pastry case and gently spread it out a little to fill the base.
- Pop back into the fridge whilst you make your frangipane filling.
Almond Frangipane Filling
- Heat your oven to 180°C/160°C Fan/355°F/Gas mark 4.
- Place your large baking tray into your oven to heat.
- Using your hand mixer, beat your butter a little to ensure a soft and spreadable in consistency. Add your caster (superfine) sugar and continue to beat on a medium-light setting until lighter in colour and soft and spreadable, this can take 1-2 minutes. Wipe your bowl down as you go with your spatula to ensure everything mixes evenly.
- Add your egg and level tablespoons of flour and beat on low until fully incorporated, then beat in your almond extract. Again wipe down your bowl to ensure all of the mixture is incorporated.
- Beat your frangipane batter for 10-15 seconds to ensure lots of air is beaten in.
- Gently fold in your ground almonds. The mixture should then look a bit like curdled egg.
- Cut off the base of a piping bag, about 2cm is enough, and then fill it with your frangipane mixture.
- Pipe frangipane into each pastry case, I find it easiest to pipe a swirl around the outside and then finish in the middle. Ensure that you leave a gap of about 5 millimetres from the top of the pastry case, so it has room to rise.
- Spread the frangipane out using a teaspoon, making sure that it completely covers the jam and there are no gaps between the batter and the sides of the tart, otherwise the jam will bubble through during baking.
- Place your tartlets onto your heated baking tray and bake for 20 minutes until the frangipane is golden, has risen and has a domed shape and the pastry is just starting to get a little light brown in colour.
- Remove from your oven and leave to cool for 5 minutes in the tartlet tins on the heated baking tray, this allows the base to continue to bake. Then gently press the frangipane down using the back of a spoon so that it flattens out.
- Leave to cool for about 20 minutes until the tartlet tins are cool, then tip out of the tins and leave to fully cool on a cool rack.
Soft fondant icing
- Split your icing (confectioner's) sugar into two equal amounts.
- Mix 2 teaspoons of cold water into each and keep mixing until smooth. The icing should be thick and gloopy, too soft and it will spill over the sides of the tart and too thick and it will not spread.
- Add a tiny dot of red food colour to one lot of icing and mix in, so that it turns light pink.
- Take a teaspoon of your icing and let it fall onto the centre of your tart.
- Using a skewer or a butter knife, gently spread the icing out so that it covers the frangipane. It is worth taking your time to just coax the icing out so that you keep control of the flow and shape.
- As soon as you have iced a tartlet carefully place half a cherry on top!
- Enjoy! xx


Hi, thank you so much for your comment, I am so pleased to hear you enjoyed this recipe 😊