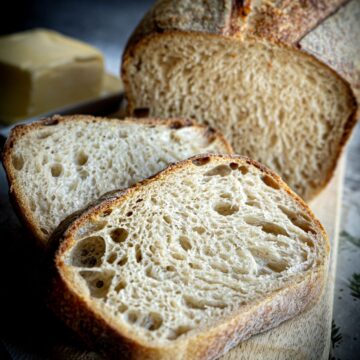
White Bread Loaf


The simplest of recipes! Make your own perfect white bread loaf, light and fluffy with a soft but tight crumb, absolutely delicious!

I have become very aware of all the additives contained in shop-bought bread these days. There's a reason it's still fresh for 10 days or more. Very unnatural. This is really the main reason I have switched to baking my own bread.
This white bread literally takes just 10 minutes to make, if you have a stand mixer with a bread hook attachment. If not, it's just 10 minutes more of kneading by hand.
Usually, I make at least one Sourdough Loaf, one Seeded Granary loaf and this lovely white bread sandwich loaf once a week. I then slice up two of the loaves and freeze them in individual slices, and we eat the third one.

Jump to:
Why make this White Bread Loaf?
Made and baked in under 3 hours, including proofing times! ✔️
Malt added for extra flavour and semi-soft crust ✔️
Light, fluffy white loaf ✔️
Great for sandwiches and wonderful toasted ✔️
Far better for you - no additives ✔️
Ingredients and Substitutions

See the Recipe card below for the exact quantities
- Strong white bread flour
Strong white supermarket bread flour is fine for this recipe. Unlike Sourdough, this white sandwich loaf does not require a really high-protein flour. - Fast-action dried yeast
Again supermarket own-brand is fine. - Granulated sugar
Can be replaced with a teaspoon of honey or maple syrup. - Fine salt
- Olive oil
Adding oil to bread dough gives it flavour and softness. Vegetable or sunflower oil also work, or you can use 30 grams of unsalted butter and rub that into the flour mixture before you add the water. - Diastatic malt powder (optional)
This white bread loaf can be made without malt powder; however, I really like the flavour it gives the loaf, the fact that it makes the crumb nice and soft, and that it also softens the crust. - Warm pre-boiled water
Pre-boiled water or bottled water, rather than tap water, should be used.

Instructions
See Recipe card for exact instructions.

Add your flour to your mixer bowl (no need to sieve) along with your yeast, sugar, salt and malt powder (if using) and mix together with a wooden spoon.

Check the temperature of your pre-boiled water, it should be lukewarm, around 35-38 degrees centigrade and then mix your olive oil into it.

Fit your dough hook to your mixer and begin mixing the flour mixture on a low setting (I use the lowest setting on my KitchenAid). Gradually start to pour in your oil and water mixture.

Leave the mixer on the same low setting and allow it to mix the dough continuously for 5 minutes.

Remove the dough and check if it feels smooth. Oil the bowl with a little extra olive oil, return the dough to the bowl, and cover the bowl with cling film.

Leave the dough to double in size. My kitchen tends to be around 23-254 degrees, and my dough takes about an hour to rise.

Lightly flour your work surface and tip your dough out onto it. Gently stretch the dough out into a rectangle. Fold one-third over into the middle and then the other side over so it is top. Your dough will then be in three layers.

Roll your dough up from the shortest side nearest to you and then pinch the ends to seal it. Add your bread sling to your loaf tin and sprinkle over a layer of flour. If not using a bread sling, grease and flour the tin instead.
Lightly flour your work surface and tip your dough out onto it. Gently stretch the dough out into a rectangle. Fold one-third over into the middle and then the other side over so it is top. Your dough will then be in three layers.
Roll your dough up from the shortest side nearest to you. Pinch the ends so that the dough is sealed. Add your bread sling to your loaf tin and sprinkle over a layer of flour. If not using a bread sling, grease and flour the tin instead.

Bake your loaf in a hot pre-heated oven for 30-35 minutes until golden.
Storage
I store my bread in plastic-lined, drawstring bread bags. The bread is at its best for the first 24 hours, but can still be eaten for 2-3 days.
You can slice it up and freeze it in slices and then defrost it as you need it, if you want to keep it fresh.
Top tips for a perfect White Loaf
Use a stand mixer with a dough hook fitted
Absolute game changer.
I do not have the time and patience (or the physical energy!) to knead a loaf for 10 minutes solid to get the same results as with a stand mixer.
That said, you can absolutely make this recipe by hand if you are not lazy like me!

Use ice cubes OR bottled water to cool your pre-boiled water
Your pre-boiled water needs to be lukewarm to activate the yeast. Too cold and it will take much longer to proof, too warm and it will kill off the yeast and your bread will not rise. To be sure it is the right temperature of between 35-38 degrees centigrade, I recommend that you test the water with a thermometer.
Double-check that your dough is perfectly kneaded
Although I never have to hand-knead my white loaf dough as I find the stand mixer does the job to perfection, I do check that it is smooth and elastic before letting it prove. If not fully kneaded the gluten in your dough will not develop enough to give it structure when baked.
Grease your bowl before you prove your dough
This ensures the dough can be removed from the bowl easily after proving.
Use a thermometer to check the dough temperature
A loaf can sometimes be a lovely golden colour on the outside but still be stodgy inside. The best way to avoid this is insert a thermometer into the middle of the loaf. It is done if the temperature will be anything from 205 degrees centigrade onwards. I tend to wait until it is around 208 degrees to be on the safe side.
Bread slings are very useful
Whether I am making Easy Homemade Sourdough, Seeded Granary Bread or this White Bread loaf I always use bread slings. They are silicone mats that can:
- tolerate high temperatures
- prevent loaves from sticking to the pan
- protect the longevity of your loaf tin
- prevent the loaf from burning on the sides and base
- have handles so that you can easily remove the baked loaf from the tin.
That said, they are not a must. Simply greasing your tin will do the job too.
Preheat your oven
A must when making any bread is to bake it in a hot oven. This blast of intense heat really activates the yeast in the dough and ensures the loaf has a good rise.
Preshaping your dough
As with sourdough, folding your dough in on itself to create 3 layers and rolling it up tightens the outside of the dough, which helps to give it a good rise and a tight yet soft crumb.

FAQ
If your bread has gone stale, then slice it up into inch-sized squares, lightly cover them in olive oil (do not soak them, though) and toss them around so that they are fully covered. Season with salt and pepper and place on a baking tray. Bake in a preheated oven at 200 degrees centigrade for 5 minutes, then toss them around so that they bake evenly. Bake again for another 5-10 minutes until golden, then leave to cool.
Malt powder can be bought from health food shops. It gives bread a soft crumb, a soft crust and a lovely depth of flavour. As only a little has to be added, a bag can last a long time!
Kneading dough by hand is all about folding it and stretching it to develop the gluten and thus give the dough structure and ensure it rises.
Related
Looking for other recipes like this? Try these found in my Bread Bakes 🍞 section:

📖 Recipe

White Bread Loaf
Here's what you'll need...
- Stand mixer with bread hook attachment (or your can knead by hand)
- Bread sling optional
Ingredients you'll need...
- 500 g Strong white bread flour plus extra for rolling out the dough (4 Cups)
- 7 g Fast action dried yeast or 2 level teaspoons
- 1½ teaspoon Fine salt
- 1 teaspoon White granulated sugar
- 1½ tsp Diastatic malt powder optional
- 300 ml Luke warm pre-boiled water at about 36-37℃
- 30 ml Olive oil plus extra for greasing the bowl
- 1 Egg beaten
- 3 tablespoon Mixed seeds
Here's what we do...
- Mix together your flour, yeast, salt, sugar and malt powder (if using) in your stand mixer bowl.
- Add your olive oil to your lukewarm pre-boiled water and mix.
- Fit your dough hook to your stand mixer and start mixing the flour mixture on a low setting (I use the lowest setting on my KitchenAid).
- Immediately begin slowly trickling in your water and oil mixture whilst the mixer is running.
- Leave your dough to mix for 5 minutes.
- Remove your dough from the bowl. The texture should be slightly sticky, and the dough should be smooth. If not, then mix for another couple of minutes.
- Shape your dough into a ball.
- Lightly oil your mixer bowl with a little extra olive oil, then place your ball of dough into it. Cover with cling film (plastic wrap), or I find using a new clear shower cap works very well.
- Allow the dough to rise and double in size. This usually takes about 1-1½ hours, depending on how warm your kitchen is. My kitchen about 23-25℃ and I find an hour is plenty.
- If using a bread sling, place it into your 2-pound loaf tin and lightly flour it. If not, grease the tin instead with some extra olive oil or butter, then sprinkle over a light layer of flour.
- Lightly flour your work surface and then tip your dough out onto it.
- Spread the dough into a rectangle, the length of which should match the length of your tin.
- Taking one of the shorter sides of your rectangle, fold it over into the middle, then fold the other side on top of it. This will give you 3 layers (see blog post for a picture). Then roll the dough up, starting from the shortest end.
- Place the dough in your prepared loaf tin. Whisk your egg and use a pastry brush to paint the egg over. Then sprinkle on your mixed seeds.
- Cover it again with cling film and let it rise for another 30-45 minutes until it fills the tin and has a smooth domed top.
- Whilst your dough is rising, preheat your oven to 190°C Fan/210°C/410°F/Gas Mark 6.
- Sprinkle a little flour over your dough and then bake in the centre of your oven for 30-35 minutes until golden all over. To double-check your loaf is fully baked, place a temperature probe into the centre of the loaf. If it is between 205-210℃, then it is fully baked.
- Remove your bread from the tin and allow it to fully cool before slicing up.

Comments
No Comments