Easy Homemade Sourdough


An easy homemade sourdough recipe for a fluffy sourdough loaf full of characteristic tangy sourdough flavour.

Making good sourdough is a skill. And like most skills, practice makes perfect.
It is all about learning to understand your dough at each stage of the process. This knowledge comes with time, but if you follow my instructions below, you should end up with a lovely sourdough loaf from the get-go.
That said, even if your loaves are not perfect, they will still be lovely to eat. In all my years of making sourdough, I have only had a couple of loaves that did not work out. And my, was I green and clueless to start with, haha!
Jump to:
I encourage everyone to give sourdough a go for the following reasons....
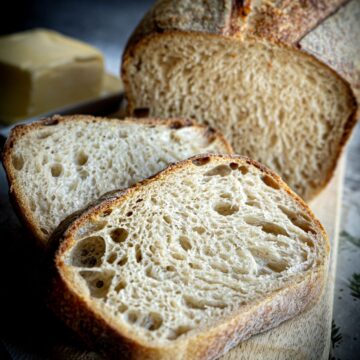
Why make this easy Sourdough?
- I give you the benefit of all my years of experience! 🍞
- Tasty tangy sourdough flavour 🍞
- MUCH healthier than bought bread 🍞
- Made with natural yeast cultivated in your sourdough starter 🍞
- Full of characteristic sourdough holes and texture 🍞
- No Dutch oven, just a lidded roasting tin 🍞
- Bake the next day, or as far as 2 days ahead 🍞
- Incredibly cheap - all you use is bread flour and salt 🍞
- Far better for digestion than shop-bought bread 🍞|
- Soooooo simple once you get used to it! 🍞

My process for Easy Homemade Sourdough
Below is just a summary; see the Recipe Card at the end of this post for precise information.
I start the process at about 8 pm the day before I am making my sourdough, by taking my starter out of the fridge and leaving it to come up to room temperature for a couple of hours.
I then discard all except 100 grams of the starter, mix in 100 grams of plain flour (all-purpose flour) and 100 ml of lukewarm pre-boiled water and set it aside to rise overnight.
Next morning, at about 8 am or so, I add my bread flours and water to my KitchenAid bowl and mix with a dough whisk until the flour has been fully soaked up by the water. I cover it and leave it at room temperature for an hour.
Tip: The autolyse process (just mixing the flour and water and then setting aside for a while) really improves the outcome of your final sourdough loaf.
I then pour in 110 grams of my starter (I don't worry too much about how active it is) and then fix the dough hook to my KitchenAid and set it to knead on low for 4 minutes.

Then I add my fine salt and set it to knead again for 40 seconds. I then cover the bowl and set it aside for 30 minutes.
After that, I do 4 stretches and folds, leave it 30 minutes and then do 3 more lots of 4 sets of coil folds every 30 minutes.

Tip: coil folds tend to be a bit gentler on your dough than stretch-and-folds, hence why I prefer them. Their purpose is to aid the formation of the gluten structure in your dough.

I then use this calculator as a guide to work out how long to bulk ferment. Usually it is 7 hours, if my dough is around 71 degrees centigrade and my kitchen is around 20-21 degrees centigrade.
Or....radical I know.... I often just ask ChatGPT to work it out for me! Having first told it exactly how I made the dough, its temperature and the temperature of my kitchen. Just so much easier!
After the bulk ferment has finished, I pre-shape the dough.
Tip: always do a pre-shape, it improves the rise of your final dough. It can be tempting to miss this bit, but I found my loaves are much improved if I pre-shape first.
After that, I shape the dough by spreading it out into a rectangle, folding each side over onto itself, rolling it up and pinching the ends together.
It is then placed in my floured banneton, covered and refrigerated until the next day.
Tip: Ensure your fridge temperature is set quite low. If too warm, the dough will continue to bulk ferment.

The following evening, I heat my oven to a very high temperature, score the dough, and mist it with a water sprayer. I bake it covered in a roasting tin with the lid on for 25 minutes, and then remove the lid, turn the heat down and continue to bake it for another 15 minutes.
It is baked once the internal temperature reaches 208 degrees Fahrenheit.

Simple 😊


Top tips for perfect homemade sourdough
Feed your starter weekly; the older it is, the better it is
The success of your sourdough really depends on how good your starter is.
I recommend buying a starter if you can as it is all active and ready to go, whereas a homemade starter can take a good 6 months or more to mature enough to make good sourdough with.
Also consider using a sourdough starter kit. It helps you to gauge how much your starter grows after being fed. That said, any jar with an airtight lid will work fine. Ideally, add an elastic band around your starter jar with the top of the band level with the starter inside so that you can see how far it grows after feeding.

Keep an eye on the dough during bulk fermentation (but don't stress over it!)
Bulk fermentation tends to be the part of the sourdough process that those new to it find the most difficult.
Understandably so, I under-fermented my dough for a good 12 months before I realised this was where I was going wrong! I tried the poke test (if the dough springs back slightly whilst still leaving an indentation = it is fully fermented), the "is it still sticky?" test (if still sticky it is not ready), the windowpane test (if ready, a section of dough can be stretchy out thinly, i.e. like a window pane), the wiggle test (if it wiggles and wobbles it is done!) and still I was disappointed in my loaves!
Cut to 12 months later, I simply started to ask ChatGPT. And it tells me. And, so far, it has always been right.
My sourdough usually takes about 7 hours to ferment.
Use high-protein flour
High-protein bread flour helps the dough become elastic, gives it structure and ensures it rises well.
A flour with 12-14 grams of protein is ideal. I use Allinson's Very Strong White Bread Flour mixed with store-brand strong white bread flour.

Use bread slings
Bread slings (picture above) are much better to use than just greaseproof paper (baking parchment) because they tolerate the very high temperature that sourdough has to be baked at.
Cold proofing
Sitting the dough in the fridge for 24-48 hours really helps it to develop that sourdough flavour.
The cold temperature slows down the activity of the yeast whilst allowing the lactic acid bacteria to thrive. The longer it is allowed to thrive, the better the sourdough will taste.
Use a lidded roaster tin, not a Dutch oven
Another game changer.
I find that a Dutch oven restricts the rise of my sourdough.
When I changed to using a lidded roaster tin, my loaves shot up, developed a lovely shape, and longed for "ear".
What is an "ear" ??? I hear you cry! Well before baking, a slit is made along the top of the sourdough; this allows the dough the freedom to rise unhindered by its skin. If it rises quickly (which is what we want and why it is baked in a really hot oven to start with), it pushes this slit wide open, and the edge of the slit will turn out to form a curve, or a lip. This is known as an "ear". And it is a coverted thing by all sourdough bakers!

Storage
Once fully cooled, wrap your Sourdough loaf in greaseproof paper (parchment paper) or use plastic-lined bread bags.
The sourdough will stay fresh for 2-3 days.
I tend to cut mine into slices, if I know I won't use it all in that time, and freeze it. Then defrost as needed.
Alternatives
Go to Bread Bakes if you would like to try another of my recipes, such as my Seeded Granary Bread, which I adore making. I will also soon be posting a whole bread loaf, which is super tasty.

FAQ
Discard all but 100 grams of starter. To this add 100 grams of plain white flour (not bread flour) and 100 grams of lukewarm pre-boiled water. Mix thoroughly and set aside for about 2-3 hours at room temperature until the starter has doubled in size and a small piece floats to the top of a glass of water. Alternatively, leave it overnight and make your sourdough the next morning.
Rye flour is a lifesaver for a weak or failing sourdough starter. Instead of feeding with just plain white flour, mix in 70 grams of plain flour and 30 grams of wholemeal rye flour along with 110 ml of lukewarm pre-boiled water. Your starter will thank you for it!
Your sourdough starter only needs feeding once a week if kept refrigerated with an airtight lid on it. If kept on the counter, it will need feeding daily.
You should keep your sourdough starter refrigerated in an airtight jar and feed it once a week. If you choose not to refrigerate it, you can keep it at room temperature, but you will need to feed it daily instead.
Related
Looking for other recipes like this? Try these:


📖 Recipe
Easy Homemade Sourdough
Here's what you'll need...
- Stand mixer with dough hook fitted or you can mix by hand using a wooden spoon or a Danish dough whisk
- Clingfilm (plastic wrap) or clear plastic shower caps are a great alternative
- Banneton however you can just use one of the loaf tins but flour it well first
- Bread lame or a sharp knife
- Bread sling optional
- Danish dough whisk or wooden spoon
Ingredients you'll need...
Starter - feeding
- 100 g Starter (½ Cup)
- 100 g Plain (all-purpose) flour (13 tablespoons)
- 100 ml Luke warm pre-boiled water at about 35℃
Sourdough
- 420 g Extra strong bread flour protein content 13-14% (3⅓ Cups)
- 80 g Strong white bread flour (⅔ Cup)
- 370 ml Luke warm pre-boiled water at about 35℃
- 110 g Sourdough starter (½ cup)
- 10 g Fine salt
- Oil for greasing olive, vegetable or sunflower oil are all fine
Here's what we do...
Starter - feeding
- The night before you want to make your sourdough, take your starter from the fridge and discard all except 100 grams of it. Then feed it with 100 grams of lukewarm pre-boiled water and 100 grams of plain (all purpose) flour. I usually do this at about 10 pm.
- Give the starter a good mix and leave it on the counter until the next morning.
Sourdough
- The next morning (I do this at around 8.30 am), tip in your flours and then your pre-boiled lukewarm water into your stand mixer bowl and use your dough whisk (or wooden spoon) to mix just until all of the water has been absorbed by the flour and no loose flour remains. Cover with cling film (or a clear, clean shower cap works well!) and set aside for an hour.
- Add your 110 grams of starter and fit the dough hook to your mixer. Leave the mixer to knead for 4 minutes on a low setting.
- Add your salt and leave mix for another 40 seconds.
- Cover again and set aside for 30 minutes.
- Wet your hands and then scoop your fingers under one quarter of the dough. Gently pull the dough up vertically and then fold it back onto itself in the centre. Turn the bowl a quarter turn and repeat another 3 times, i.e. until you are back to the start. This is the stretch and fold method.
- Cover and set aside for 30 minutes.
- This time do 4 coil folds. Place wet hands under the middle of the dough and pull it up. Let the end furthest away from you slip under the dough and then the end nearest you, so that the two ends are under the middle of the dough. Again leave for 30 minutes.
- Repeat again the above step twice more, with a break of 30 minutes in between.
- By now, you will have done one lot of stretch and folds and 3 lots of coil foils with 30 minute gaps in between. Remove the dough from the bowl and then lightly oil it.
- Remove the dough from the bowl, lightly oil it, then return the dough to the bowl, cover it and leave it to bulk ferment.
- Use this calculator to work out your bulk fermentation times (or ask ChatGPT!).My dough was 71.4 ℉, my kitchen was about 20℃ and I left my dough to bulk ferment for 7 hours.Generally, when ready, the dough will have pretty much doubled in size, have a bit of a shiny, slightly domed top, and a few bubbles may be poking through at the edges. You should be able to pull a segment up, and it will stretch into a thin sheath without breaking. This is known as the windowpane effect.
- Lightly flour your work surface and tip your dough out onto it.
- Tip your dough out and take the edges up into the centre to form a ball. Turn the ball of dough over and use your hands to cup it and pull it in a circular motion. Doing this several times will tighten the surface of the dough. This is called pre-shaping. Leave for 30 minutes.
- Gently stretch the dough into a loose rectangle, about 20 cm x 25 cm
- Fold one of the long sides over into the middle and then do the same with the other side so that you have 3 layers on top of each other.
- Starting with the short side nearest to you, roll the dough up fairly tightly. Pinch the ends together.
- Flour your banneton and then place the dough into it with the seam side facing up.
- Cover with clingfilm/shower cap again and place in the fridge (fridge needs to be at about 5 degrees) and leave for 24-48 hours. This cold proof is what gives the dough it's typical sourdough flavour.
- Pre-heat your oven to 250℃/230℃ fan/480℉/Gas mark 9.
- Once the oven has heated up take your dough from the fridge and sprinkle over some flour. Place your bread sling over the top and flip the dough onto it.
- Take a bread lame or a very sharp knife and cut a line about 1 cm deep from one end of the dough to the other along with long side. You can make further cuts in pattern over the top if you choose to.
- Spray the dough with water (this creates those characteristic sourdough blisters on the dough as it bakes).
- Lift the dough using the bread slings and place it in the loaf tin and then place the other loaf tin on top.
- Bake for 20 minutes.
- Reduce the temperature to 220℃/200℃ fab/390℉/Gas mark 7 (I usually leave the oven door open a little to bring the temperature down quickly) and remove the loaf tin covering the bread.
- Bake for a further 15 minutes until browned all over and the internal temperature of the bread is between 205-210℃.
- Remove the bread from the tin and allow to fully cool before cutting it (the dough will continue to steam inside hence it is important not to cut it too soon).


Comments
No Comments