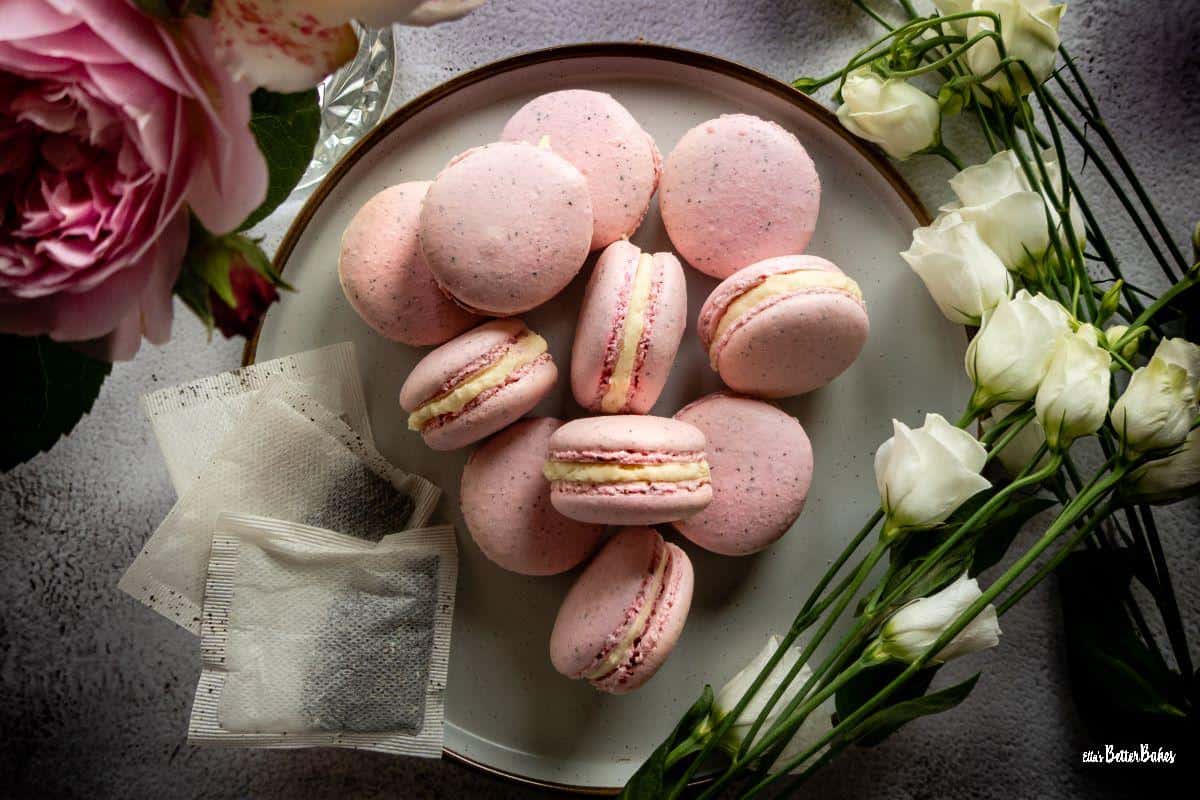
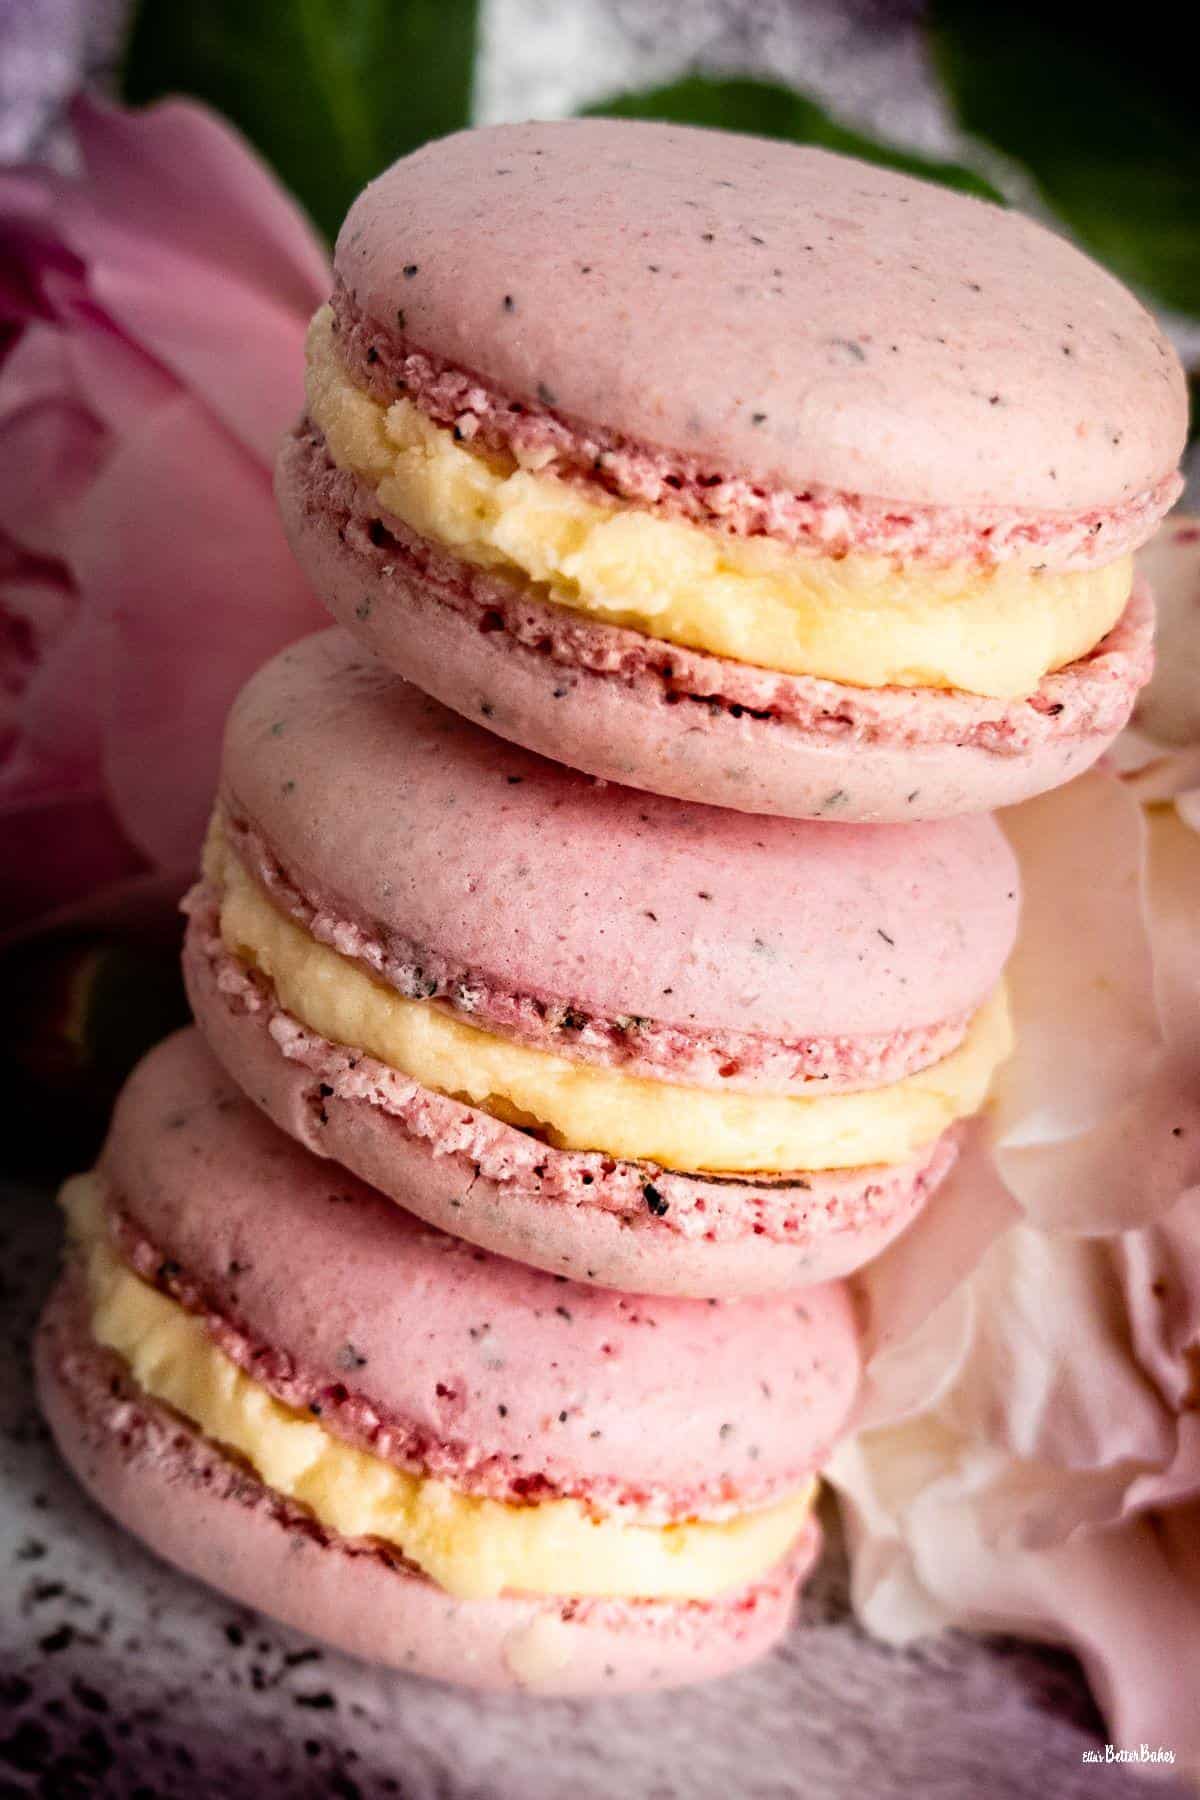
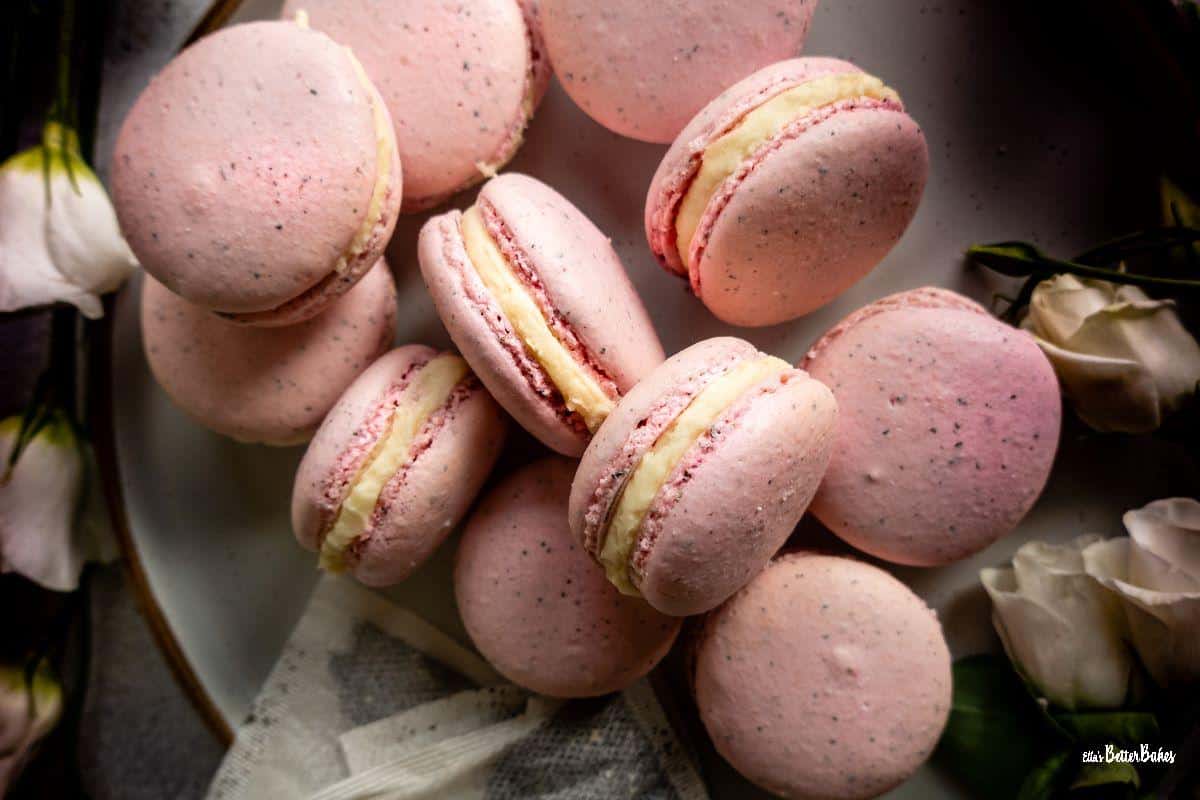
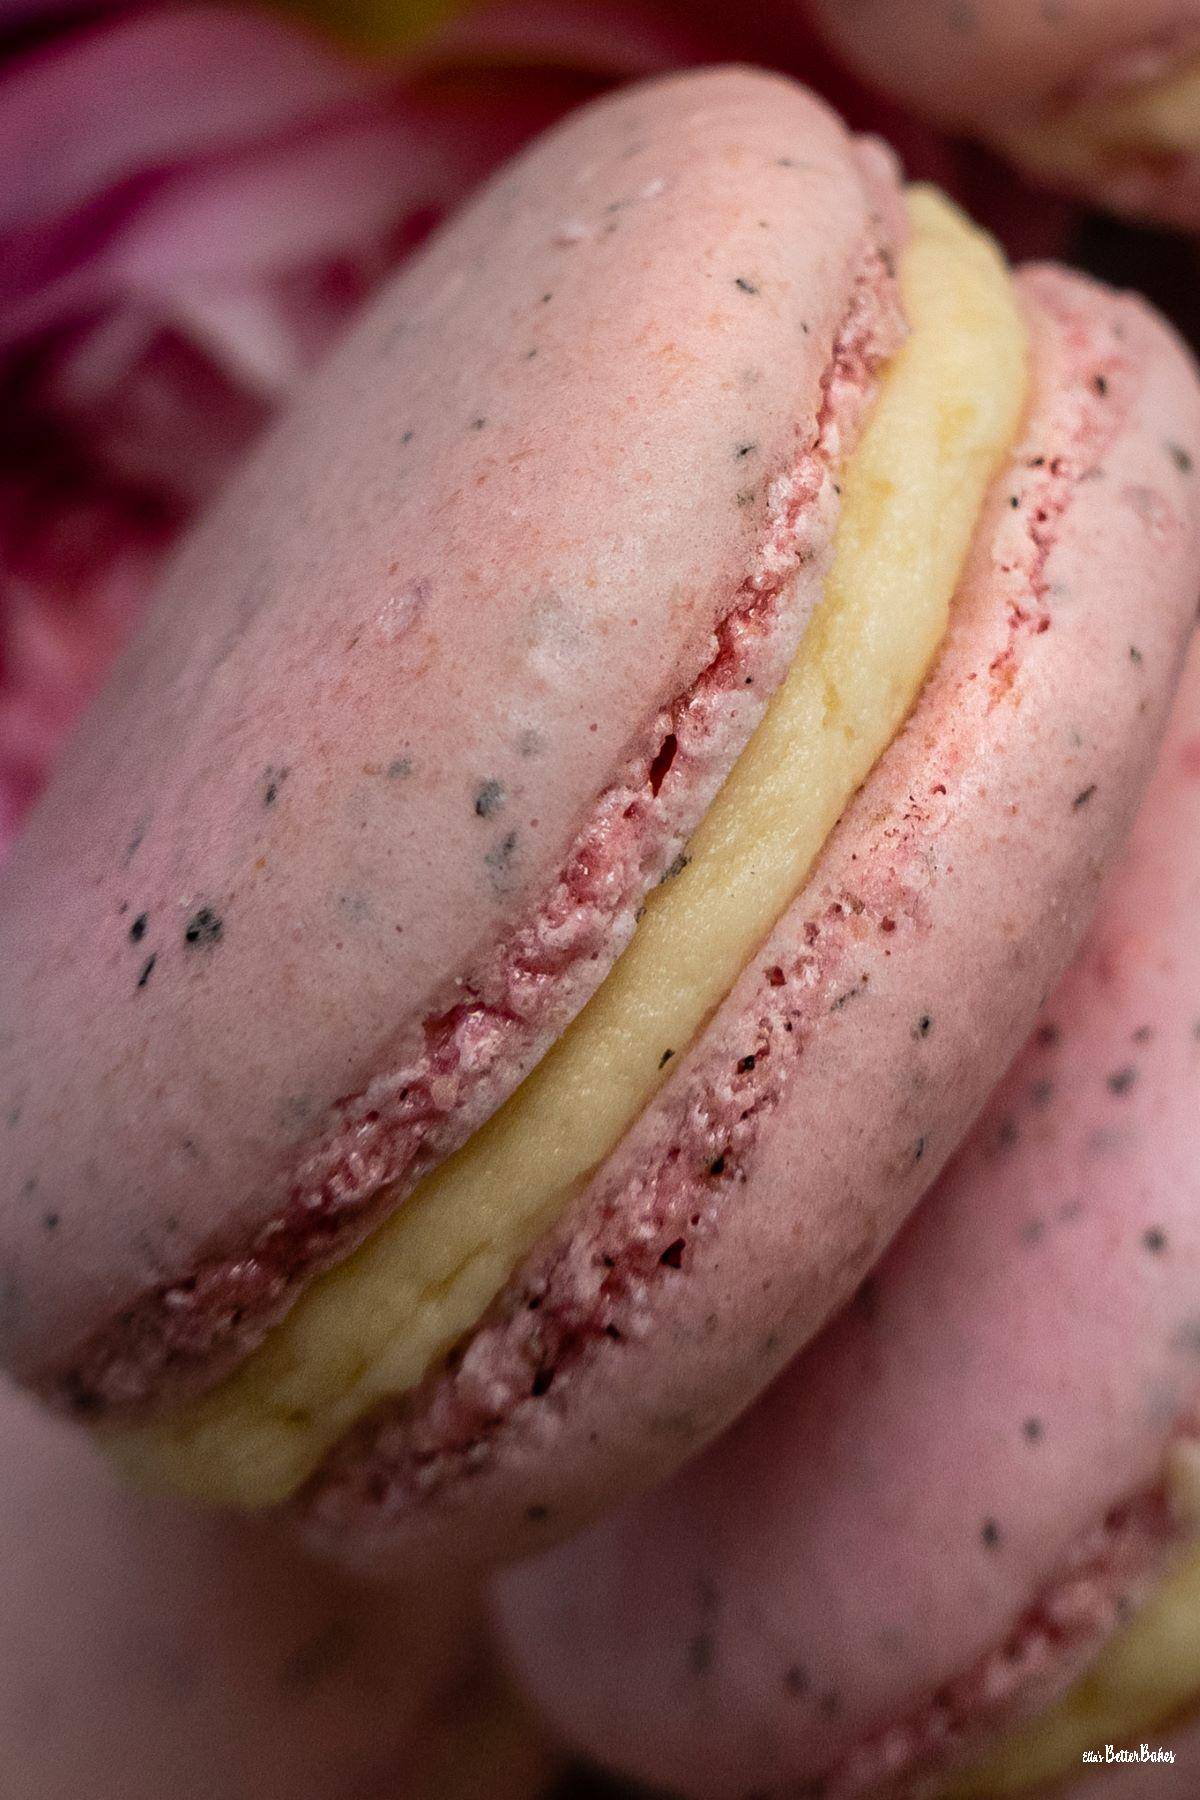
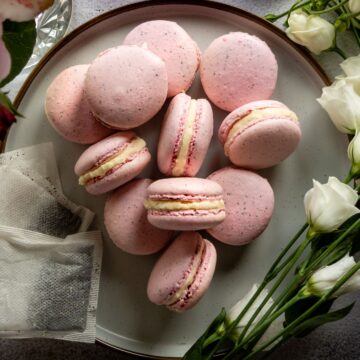
Earl Grey Macarons
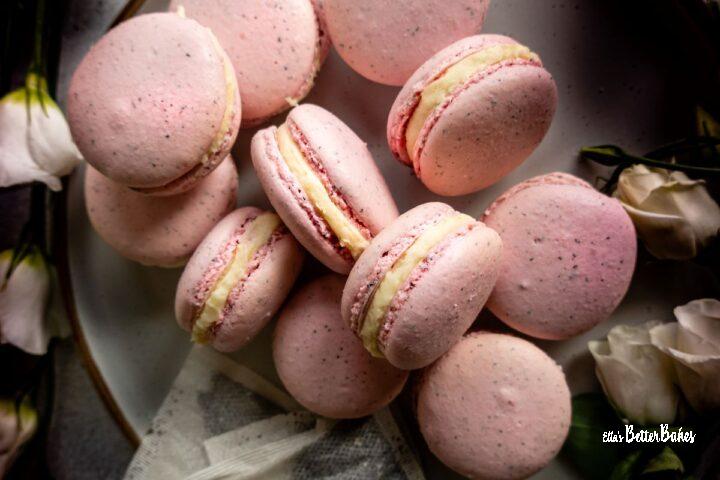

Fragrantly and subtly flavoured Earl Grey Macarons filled with soft maple syrup buttercream. Perfect if you fancy something extra special.
Macarons are a French-based confection made from beaten meringue and almond flour. They are petite and delicate with a soft inside and a crisp, smooth shell and are usually filled with a complimentary buttercream, jam or chocolate ganache.
Often brightly coloured, these exquisite little cookies are frequently served for afternoon tea. Earl Grey Tea Macarons work particularly well because the tea flavouring is very subtle and brings a distinct elegance to these already beautiful little cookies.
Macarons are actually quite simple to make, and, as with my recipe for Easy Mango Macarons, I have purposely laid out the instructions in the Recipe card to be quite detailed, to ensure success.
Hint: Macarons should not be confused with macaroons, which are more of a traditional cookie made with coconut.
Jump to:
A few good reasons to make these Earl Grey Macarons...
Earl Grey tea, subtle flavouring✔️
Soft on the inside and crisp on the outside✔️
Limited ingredients required✔️
Soft buttercream filling ✔️
Perfect for something a little special ✔️

Ingredients and Substitutions
- Almond flour - this is not the same as ground almonds. If you cannot source almond flour from the supermarket, you can purchase it from health food stores. Otherwise, you can grind ground almonds up in a blender, but do this in batches and pulse the blender; otherwise, it will easily turn into almond butter.
- Earl Grey tea leaves - taken from Earl Grey tea bags
- Granulated sugar
- Icing (confectioner's) sugar
- Egg whites - older egg whites create a better meringue
- Fine salt
- Cream of Tartar - optional, but it can help stabilise the egg whites so they beat up frothier
- Vanilla extract -or vanilla bean paste
- Unsalted butter
- Maple syrup
- Gel red food colouring - gel needs to be used, as water-based food colourings will dilute the batter.
Instructions
Brief instructions are noted below; however, please see the Recipe Card for more details.
Earl Grey Macarons
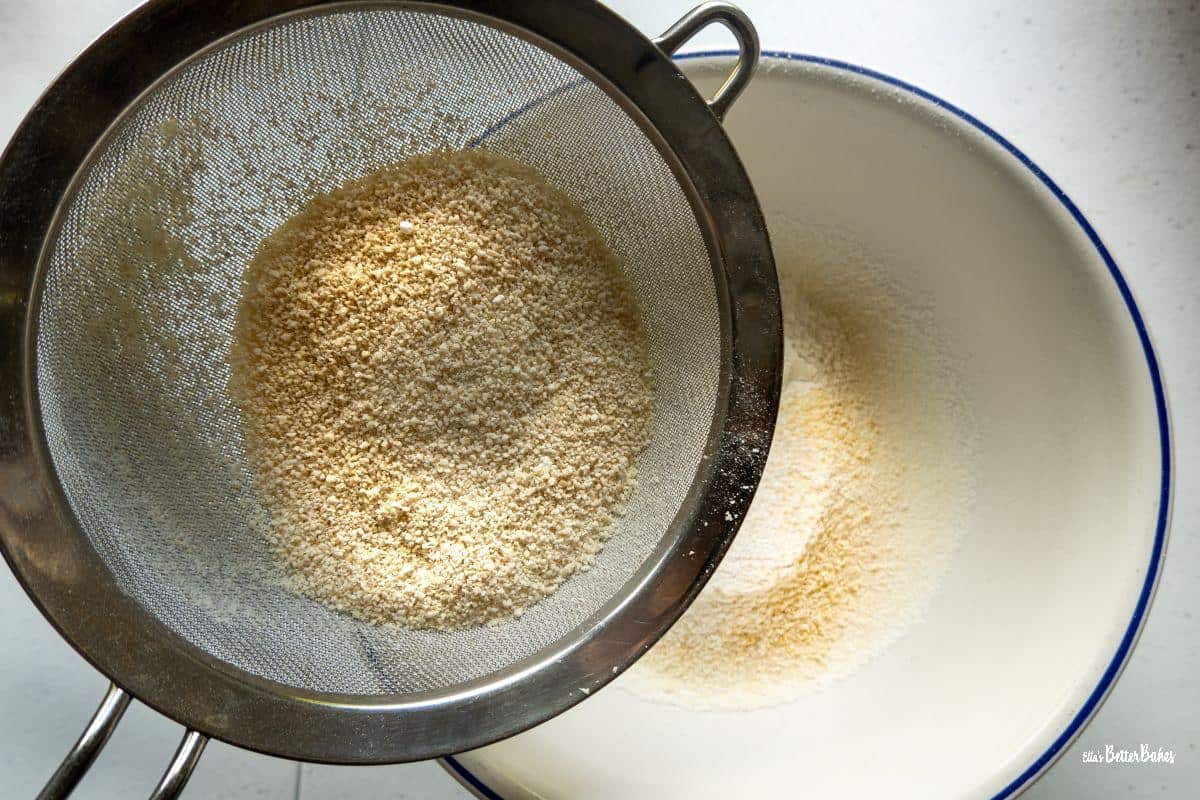
Sift almond flour, salt and icing (confectioner's) sugar together, pressing through the sieve with the back of a large spoon if needed.
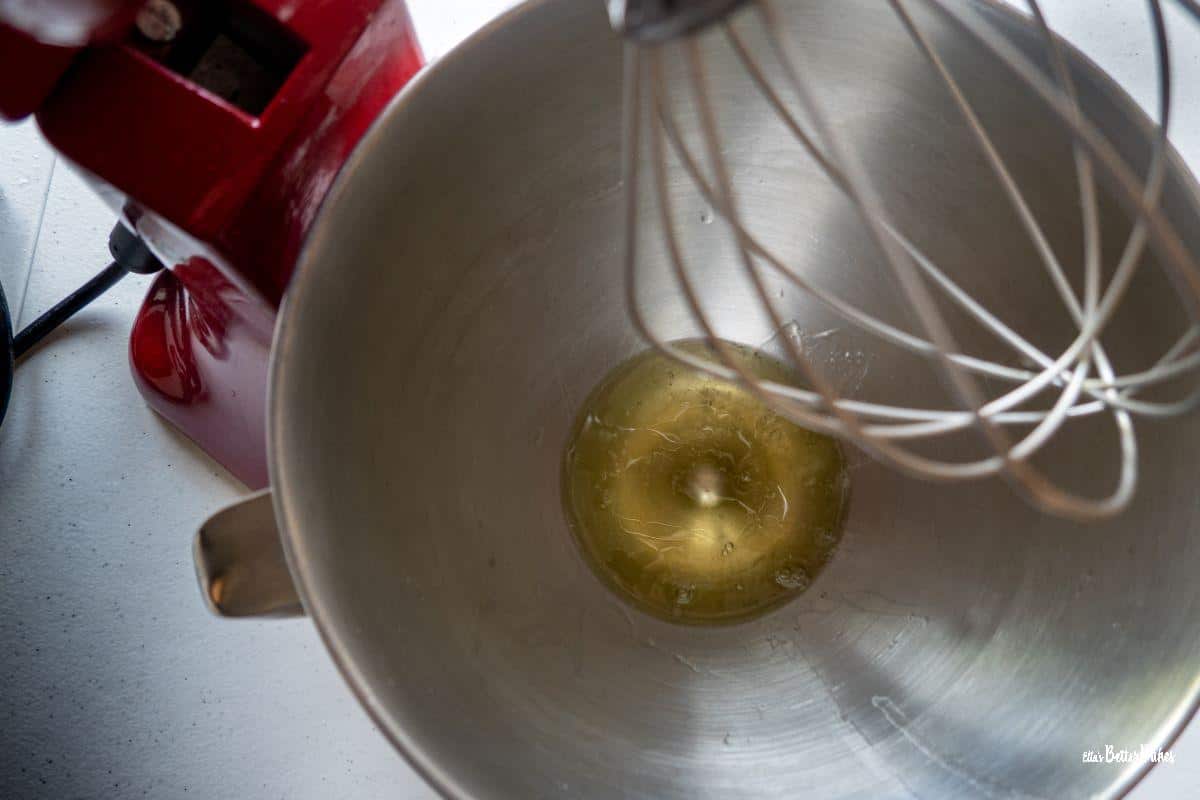
Beat egg whites briefly until they become foamy, and then add cream of tartar and beat again until they start to form gentle peaks.
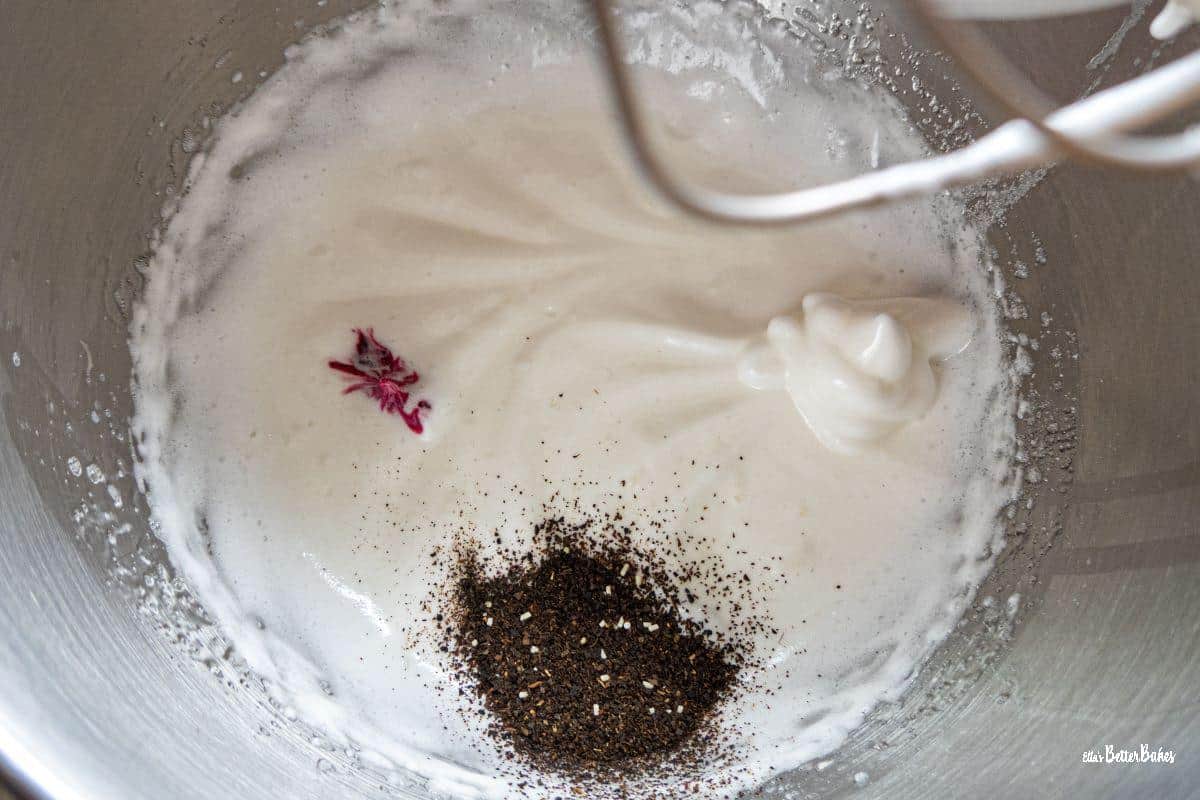
Leaving your mixer running on low, very gradually add your sugar spoonful by spoonful. Once it has all been added, beat on high until soft peaks are formed and then add Earl Grey tea leaves and food colouring.
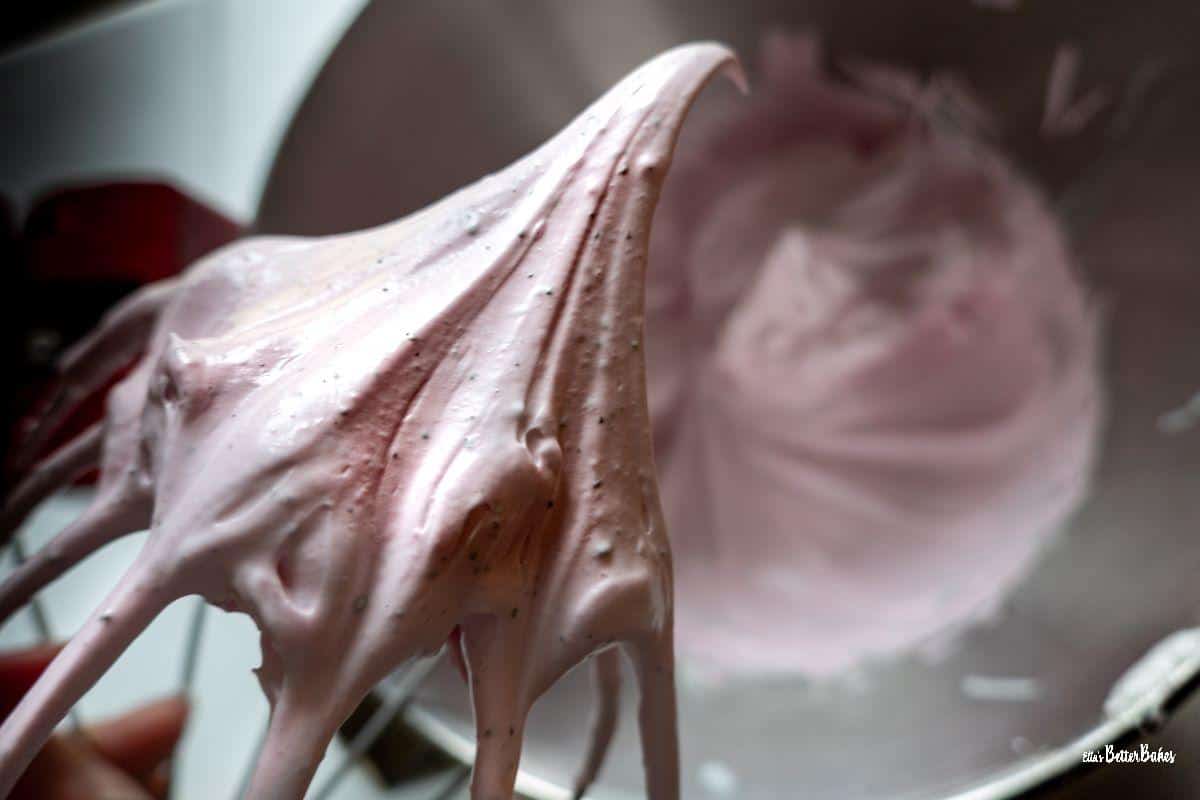
Beat again until the meringue forms stiff peaks, and then fold in vanilla extract.
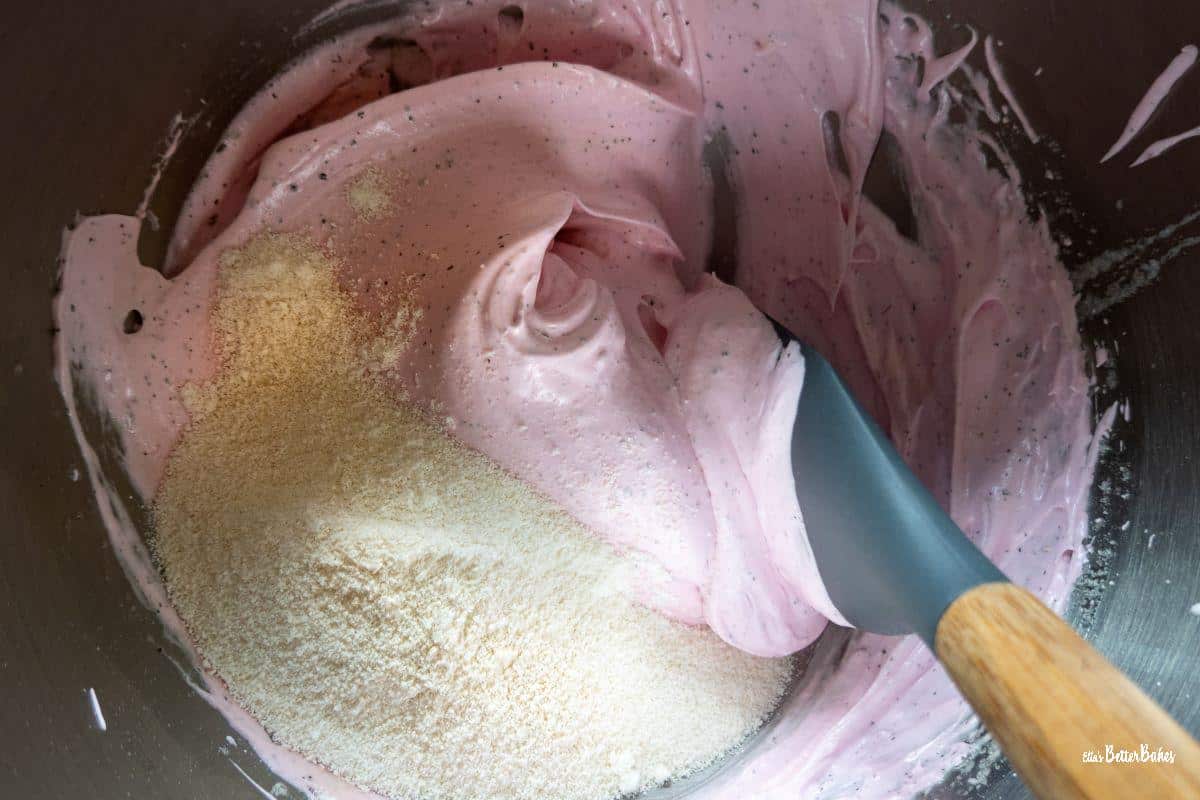
Fold your almond flour mixture in 3 three separate lots (see the Macoronage technique as noted below).

Once your mixture starts to feel a little looser, check if it is ready by scooping some up onto your spatula and, holding it above the bowl, see if you can let it fall in the shape of a distinctive figure 8 shape without breaking. If you can, it is ready; if not, continue mixing.

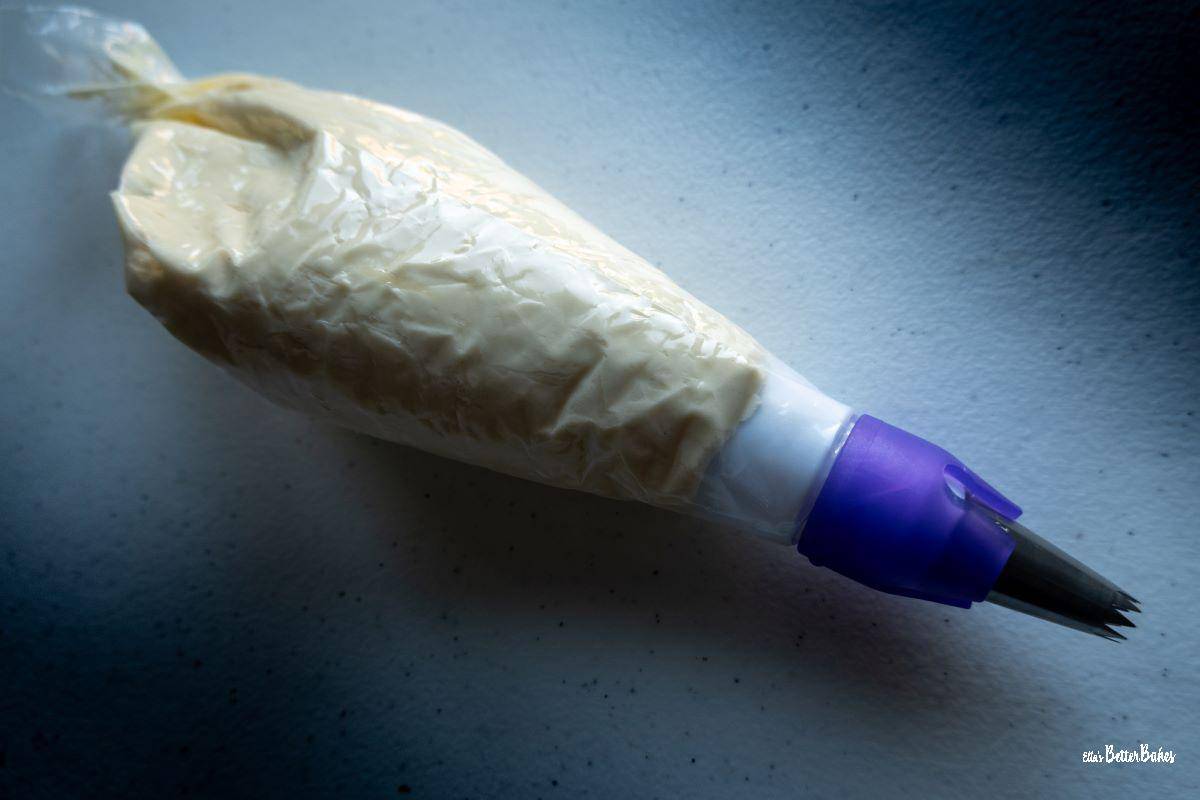
Fill your piping bag and pipe circles of the macaron batter onto a lined baking sheet or macaron mat. Bang the tray down 5 times to release air bubbles and pop any bubbles that appear on the surface. Rest for 45 minutes until the surface has dried, and then bake for 17 minutes.
Maple Syrup Buttercream
Beat your butter until very soft and then gradually beat in sifted icing (confectioner's) sugar.
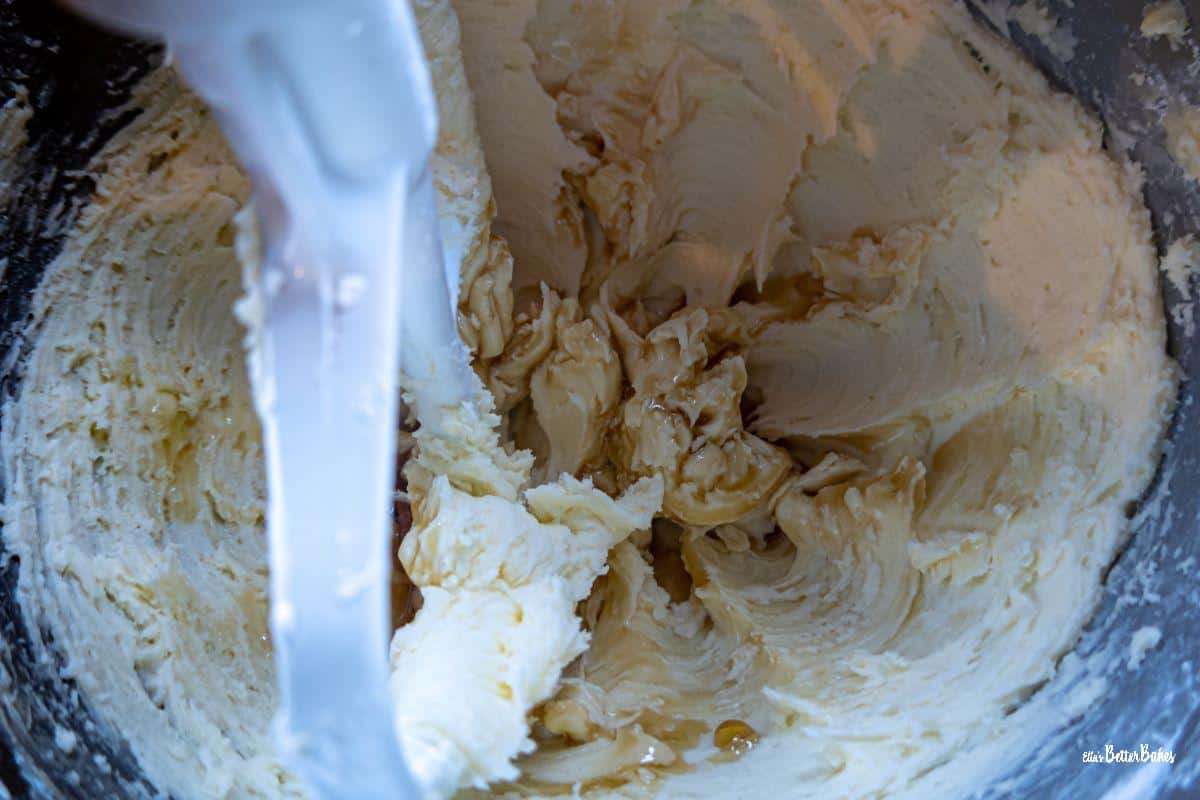
Beat in your maple syrup and milk.
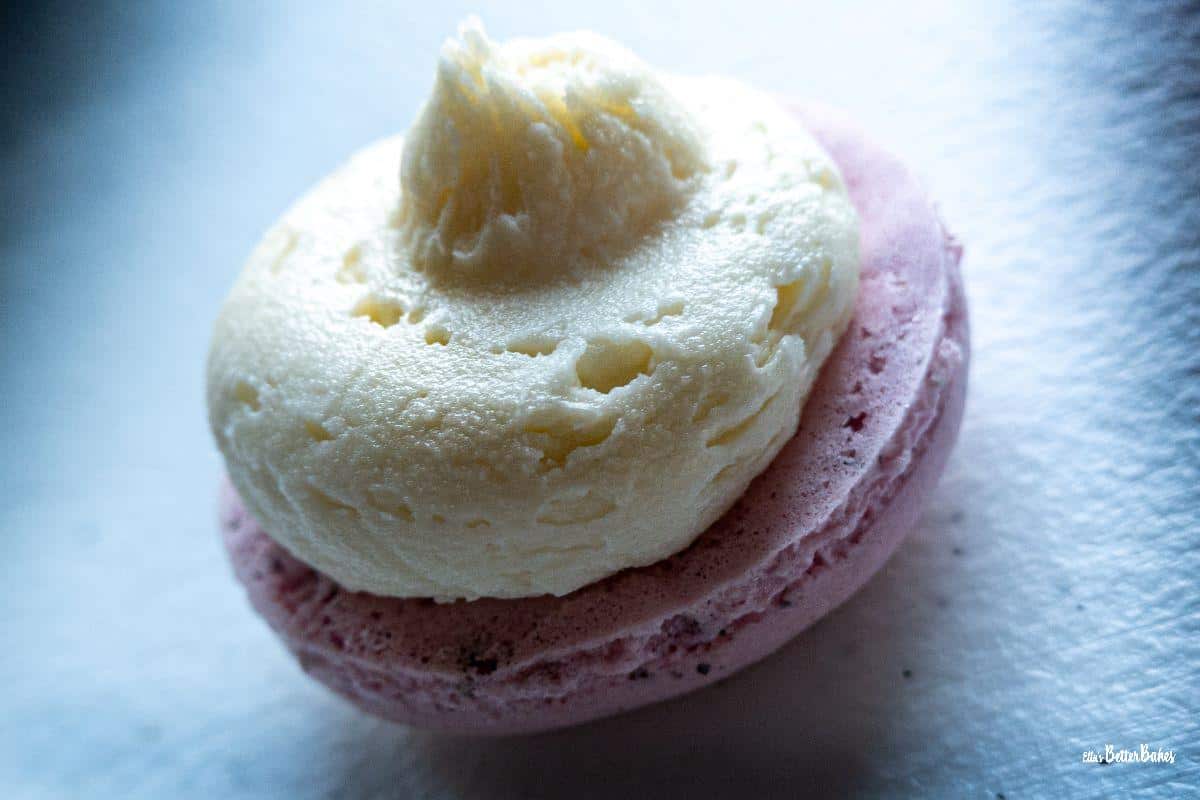
Fit a star nozzle to your piping bag and ice the base of an Earl Grey Macaron shell. Place another on top and press down very lightly to secure. Repeat with the rest.
For best results, leave the macarons to mature for 24 hours before eating.
Variations
Macaron flavourings can easily be varied, but the basic ingredients and technique will always remain the same. My Easy Mango Macarons are an example of an alternative, but you could also try:
Chocolate macarons: sift in 10 grams of cooking cocoa powder with your almond flour and icing (confectioner's) sugar. Fill the macarons with buttercream or chocolate ganache.
Red velvet macarons: make chocolate macarons as above, but add extra red gel food colouring and fill with cream cheese frosting.
Storage
Macarons are at their best 24 hours after baking, as they become a little chewier by this time and therefore even more tasty.
They should be stored in an airtight container and will last for a week or more if kept refrigerated.
You can freeze baked macaron shells before adding the buttercream for up to 3 months.
Expert Top Tips
Making macarons is a precise and scientific process; however, if you follow these key tips you are guaranteed success:
- Weigh ingredients using kitchen scales; exact measurements are key when making macarons.
- Age your egg whites in advance. Leave them covered in your fridge for 24 hours before using as this thins the whites out and ensures they beat up into a large volume.
- A metal bowl or ceramic bowl should be used as plastic can harbour traces of grease and prevent the egg whites from beating into meringue.
- Constantly test for that magic figure 8 as macaron mixture can quickly become overworked
How to tell when your Earl Grey Macaron batter is ready...
Undermixed macaron batter - if the batter falls from the spatula in one big lump, then it is undermixed and will result in hollow macarons with an uneven and lumpy top.
Overmixed macaron batter - if the batter is very loose and when it falls from the spatula, it immediately sinks back into the batter, then it is overmixed, and your baked macarons will be flat and thin.
Perfectly mixed macaron batter - your batter is mixed to the perfect consistency when it falls from the spatula in an unbroken ribbon, which can be drawn into a figure 8 shape. This figure of 8 should then take its time to absorb back into the batter.
FAQS
Macaronage is the method used to fold the macaron mixture in order to produce the correct texture and consistency needed for macarons. Starting at the top of the bowl, scrape your spatula anti-clockwise around the side of the macaron mixture in a circle. When you return to your starting point back at the top, turn the spatula over onto itself, so that the mixture is folded over. Then drag your spatula through the centre of the mixture from top to bottom. Once at the bottom, drag the spatula around for a full circle and a half so that you are back at the top and fold the mixture back on itself again and down through the centre again. Repeat this method until you can "draw" a figure of 8 figure without the macron mixture breaking.
The outside of macarons should be thin, crisp and smooth. The inside should be light and fluffy with no gap between the base and the top. The macarons should have risen up and created a fuzziness around the base (called feet).
Macarons are ready when they have risen and developed "feet" (the little fuzzy bit that sticks out of the base), when they feel dry to the touch and when the base does not stick to the greaseproof paper.
This may be because your egg whites were not aged first (the whites should be covered and refrigerated for 24 hours before using), or because your batter was too wet. It can also be because the skin did not form on the macaron before baking; the surface of macarons needs to be dry before baking.
Linked Recipes
Similar recipes which are popular on Ella's Better Bakes...

Easy Mango Macarons, these macarons have a mango pureed centre, surrounded by soft buttercream.
Lemon Meringue Mini Tarts are full of homemade lemon curd filling and a meringue top.
Chocolate Nutella Meringue Nests swirls of meringue with a Nutella filling.
📖 Recipe
Earl Grey Macarons
Here's what you'll need...
- Macaron mat or greaseproof paper
- Large, heavy gauge baking sheet
- 1 piping bag with a Wilton 1A round nozzle fitted
- 1 piping bag with a star nozzle fitted
Ingredients you'll need...
Earl Grey Macarons
- 80 g Almond flour (13½ tbsp)
- 100 g Icing (confectioner's) sugar (13 tbsp)
- Pinch of salt
- 80 g Egg whites (room temperature) (US = whites from 2 extra large eggs)
- ¼ teaspoon Cream of tartar
- 80 g Granulated white sugar (11 tbsp)
- Tea leaves from 1 Earl Grey teabag
- Gel food colouring (I used Sugarflair Claret)
- ½ teaspoon Vanilla extract
Earl Grey Macaron Filling
- 100 g Unsalted butter (7 tbsp)
- 200 g Icing (confectioner's) sugar sifted (US = 1 cup and 11 tbsp)
- 1 tablespoon Maple syrup
- 1 tablespoon Milk
Here's what we do...
Earl Grey Macarons
- Measure a piece of greaseproof (parchment) paper for your baking tray and then draw out 1½ inch circles onto it, leave a 1 cm gap between them.
- Sift your almond flour, salt and icing sugar together through a fine-mesh sieve. This can take a while if the flour is a bit coarse so you may need to use a metal spoon to push the mixture through the sieve.
- Ensure your metal or ceramic mixing bowl and whisk are clean, to be sure you can wipe them down with white wine vinegar.
- With the whisk attachment fitted, whisk your egg whites briefly until they become a little foamy and then add your cream of tartar.
- Whisk your egg whites again until they form soft, foamy peaks that bend over onto themselves.
- Leaving your stand mixer on low, gradually whisk in your granulated sugar, making sure each addition is fully mixed in before you add the next. I tend to count 10 seconds between each spoonful. Remember to wipe around the sides of the bowl with a clean spatula to be sure all of the sugar is mixed in.
- When you've added all of your sugar, turn your mixer up to medium-high and give the meringue mixture a good whisk until it forms soft peaks that bend back on themselves, rather than stand up straight.
- Next, add your Earl Grey tea leaves and your gel food colouring, then whisk on a high setting until your meringue forms stiff peaks that no longer fold back on themselves but remain rigid and upright, i.e. hey should be pointy peaks that do not collapse over.
- Add your vanilla extract and fold in just a few times to start to incorporate.
- Add ⅓ of your almond flour and icing sugar mixture and fold in with your spatula. Stop as soon as your flour mixture has disappeared then repeat twice more until it has all been mixed in.
- Keep folding your mixture (this is called macaronage - see main blog post for a description of the technique), until you can hold up your spatula and move it in the direction of a figure 8 and the batter falls into this shape like ribbon, without breaking. You don't want to risk over-mixing as this will ruin your macarons, so keep checking your batter for this magic moment and then immediately stop folding.
- Add the batter to your piping bag with a Wilton 1A circle piping tip added. You may find it easier to pop the piping bag into a pint glass, fold down the sides and then add the batter, so it doesn't get too messy!
- Turn your greaseproof paper over, so that the circles are facing down and therefore the outline does not transfer to the baked macarons and add blobs of meringue to the corners to secure it to the tray
- To pipe your Earl Grey Macarons, take your piping bag and hold it at a 90° angle, press to squeeze out a little mixture into a small circular blob in the centre of one of your drawn circles. Then pull back very slightly and squeeze again until you have nearly filled your circle. Stop piping just before you reach the edge of the circle as the macaron mixture will spread out a little whilst drying and baking.
- Bang the trays down 5 times to release any air bubbles and pop any air bubbles that rise to the surface of the macarons with a cocktail stick.
- Set aside to settle for about 45 minutes at room temperature. Once the macarons have a "skin" on them, i.e. you can drag your finger over the top and they are not wet, they are ready to be baked. Noted that if they do not dry easily you can heat your oven to the lowest setting and, leaving the door open, place them in the oven until dry.
- Set your oven to 130°C Fan/150°C/300°F/Gas Mark 2.
- Place the macarons on the bottom or middle shelf of your oven.
- Bake for 17 minutes. The macarons are ready when they have risen a little and developed "feet", they no longer feel tacky on the top and they are no longer stuck to the greaseproof paper. If you find one of these elements has not occurred, leave them to bake for another couple of minutes, but be careful as they will quickly overbake.
- Leave your macarons to dry in your tin for 10-15 minutes then remove them to a cooling rack.
Maple Syrup Buttercream
- Beat your butter until soft and smooth.
- Beat in one heaped dessert spoonful of sifted icing (confectioner's) sugar at a time until all of it has been mixed in.
- Add your maple syrup and milk and beat in.
- Fit your star nozzle to a clean piping bag and pipe a blob (about a teaspoonful) in the middle of the base of a macaron, then place another on top, pressing down very slightly to affix it and spread the filling to the edges.
- For best results, leave your macarons for 24 hours to mature before eating.
Supporting Notes
- Macaronage correctly to do this:
- scrape your spatula anti-clockwise around the side of the Earl Grey Macaron mixture, when you return to your starting point, turn the spatula over onto itself, so that the mixture is folded over;
- then drag your spatula through the centre of the mixture from top to bottom;
- once at the bottom drag the spatula around for a circle and a half back to the top and fold the mixture back in on itself again;